Greetings! I'm Aneesh Sreedharan, CEO of 2Hats Logic Solutions. At 2Hats Logic Solutions, we are dedicated to providing technical expertise and resolving your concerns in the world of technology. Our blog page serves as a resource where we share insights and experiences, offering valuable perspectives on your queries.
Laravel Vapor is an auto-scaling, serverless deployment platform for Laravel, powered by AWS Lambda. It is a cost-effective system, you only need to pay for the usage of your application. Vapor makes it easy to use AWS Lambda-powered serverless application in such a way that you don’t need to do any setup for AWS Lambda.
Here’s a Tutorial on how to deploy a Laravel application with Vapor. The following topics will be covered in this Blog.
- Setting up Vapor Locally
- Link AWS Account
- Creating Projects
- Deployments
- Storage
- Databases
- Domain
Vapor requires PHP 7.3+ and Laravel 6.0+.
First, you need to create an account at https://vapor.laravel.com/. There is no trial period, you need to subscribe to it using an active credit card. After creating an account you need to set up your Vapor locally in your Laravel application.
Setting up Vapor locally
To deploy your Vapor applications, you need to install the Vapor CLI using the composer using the command
composer require laravel/vapor-cli
To execute a vapor command you need to need to execute it via the vendor/bin directory of your project eg:-
php vendor/bin/vapor list
Login to Vapor CLI using vapor login providing the email address and password of your Vapor account when prompted.
After Login you need to install the laravel/vapor-core package. This package contains various Vapor runtime files and a service provider to allow your application to run on Vapor. You may install the Vapor Core into your project using Composer:
composer require laravel/vapor-core
The next step is to link an AWS account.
Link AWS Account
To deploy your application using Vapor, you will need to link an active AWS account on your team’s settings management page. For this, first you need to login to your AWS account and create an IAM User.
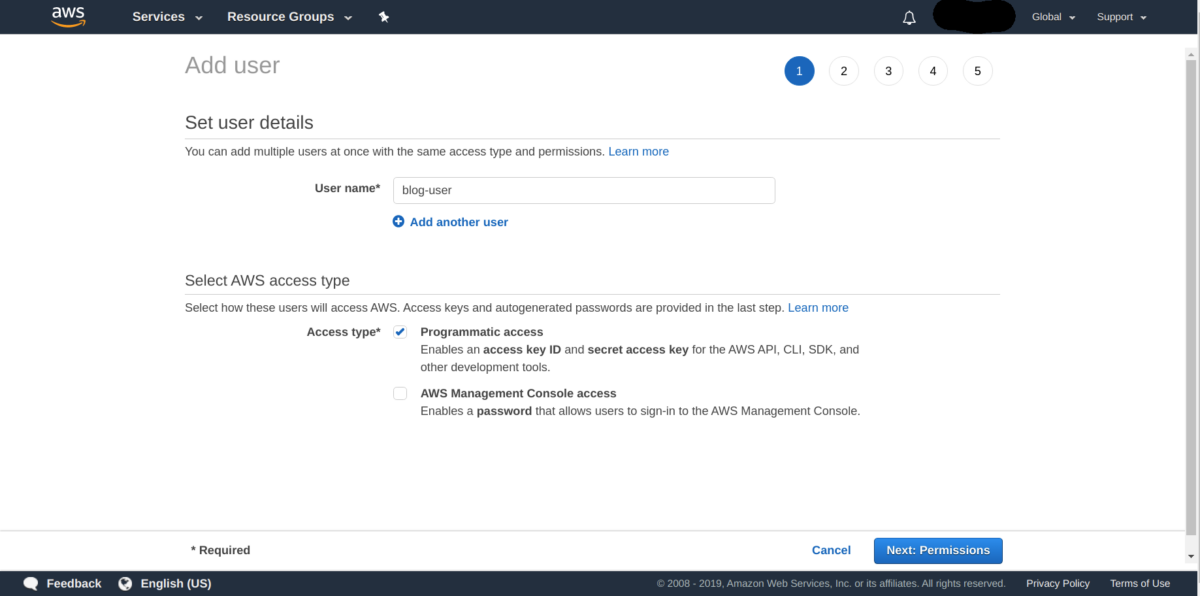
To create an IAM User in the AWS console, navigate to the IAM service on your AWS dashboard. Select “Users” from the left-side navigation panel.
Next, click the “Add user” button and choose a username. When selecting an “Access type”, select “Programmatic access”. This instructs AWS IAM to issue an access key ID and secret access key for the IAM user. Then, click “Next”.
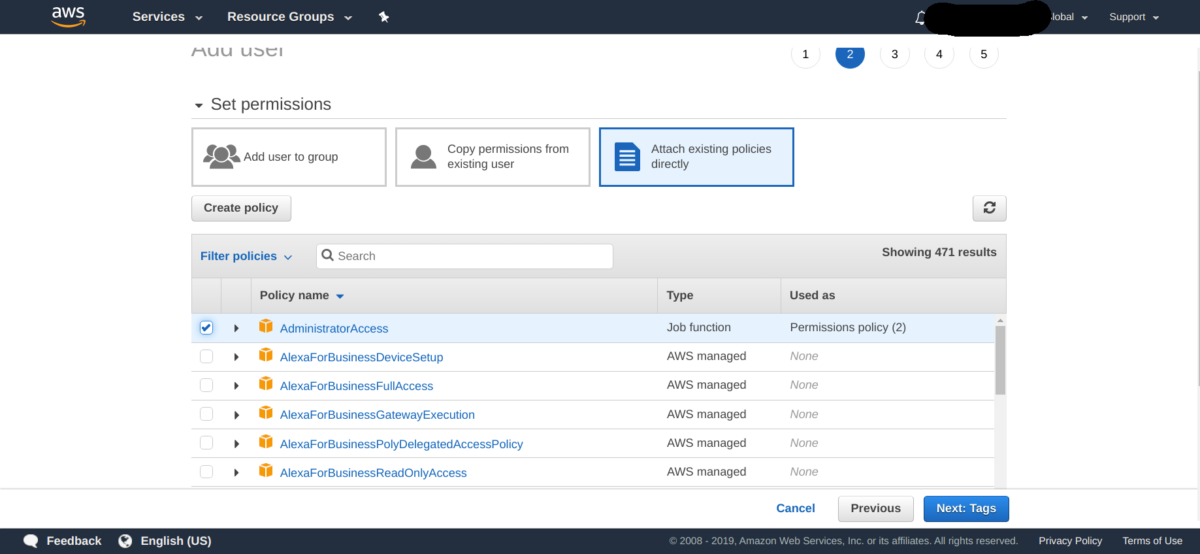
On the permissions management screen, you may grant full administrator access to the IAM user by selecting the “Attach existing policies directly” option and the “AdministratorAccess” policy. Once the policy has been attached, you may click “Next”.
Skip the Tags section. In the next section, click Create User button. Once the user is created, AWS will display the access key ID and secret access key for the user. These credentials should now be added to the team’s settings management page. Now you can start creating the Vapor Project from your Vapor CLI.
Creating Projects
To create a Vapor project you need to execute vapor init the command. Enter the project name and AWS region name when prompted. It will also ask to install the Laravel/vapor-core package. You can enter the ‘no’ option since you have already done that.
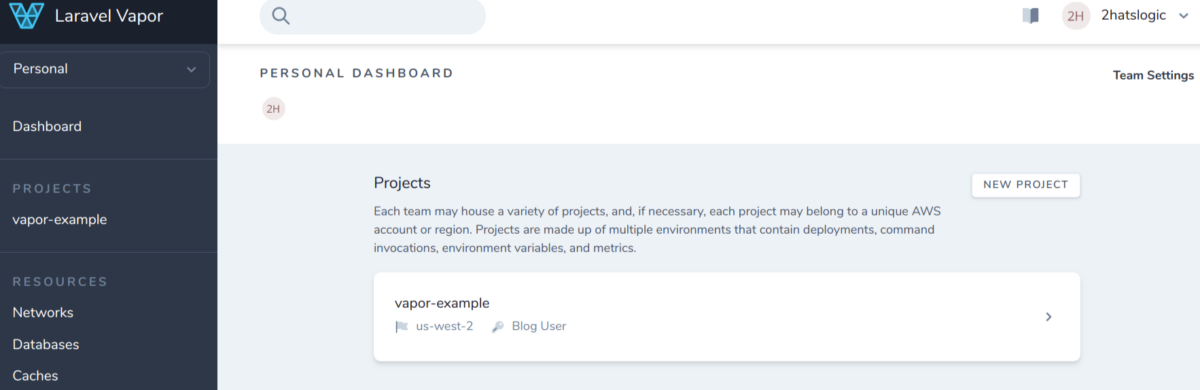
The init command will generate a vapor.yml file in the root directory which contains all the information to deploy the project. Now a new project will be created in the Vapor dashboard.
The vapor.yml file will be the following when created.
[code lang=”js”]id: 3958name: vapor-example
environments:
production:
memory: 1024
cli-memory: 512
build:
– ‘composer install –no-dev’
– ‘php artisan event:cache’
– ‘npm ci && npm run prod && rm -rf node_modules’
staging:
memory: 1024
cli-memory: 512
build:
– ‘composer install’
– ‘php artisan event:cache’
– ‘npm ci && npm run dev && rm -rf node_modules’[/code]
There will be two environments, “production”, and “staging”.
Each environment is assigned a separate vanity URL which you can use to access the application immediately after it is deployed. To view your application you need to deploy it.
Initiate Deployments
To initiate a deployment, execute the deploy command through
vapor deploy production
This will generate the deployment for the production environment. You can view the deployment details from the Vapor UI like below.
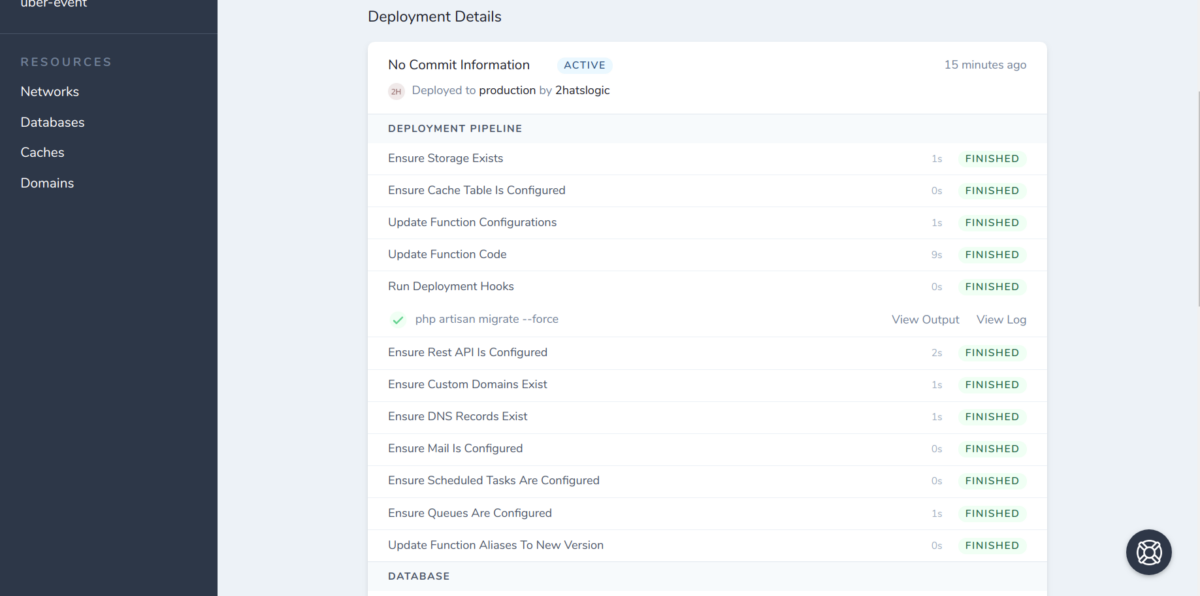
You may define build hooks and deployment hooks for an environment using the build key and deploy key respectively within your vapor.yml file. You can tell the Vapor to run the artisan migrate function after it is deployed or install composer in your local file system before deployment in your vapor.yml file using deploy and build hooks respectively.
[code lang=”js”]id: 3958name: vapor-example
environments:
production:
build:
– ‘composer install –no-dev’
– ‘php artisan event:cache’
– ‘npm ci && npm run prod && rm -rf node_modules’
deploy:
– ‘php artisan migrate –force’[/code]
During deployment, Vapor will automatically extract all of the assets in your Laravel project’s public directory and upload them to Amazon S3 bucket. So you should always generate URLs to these assets using Laravel’s asset helper
<img src="{{ asset('img.jpg') }}">
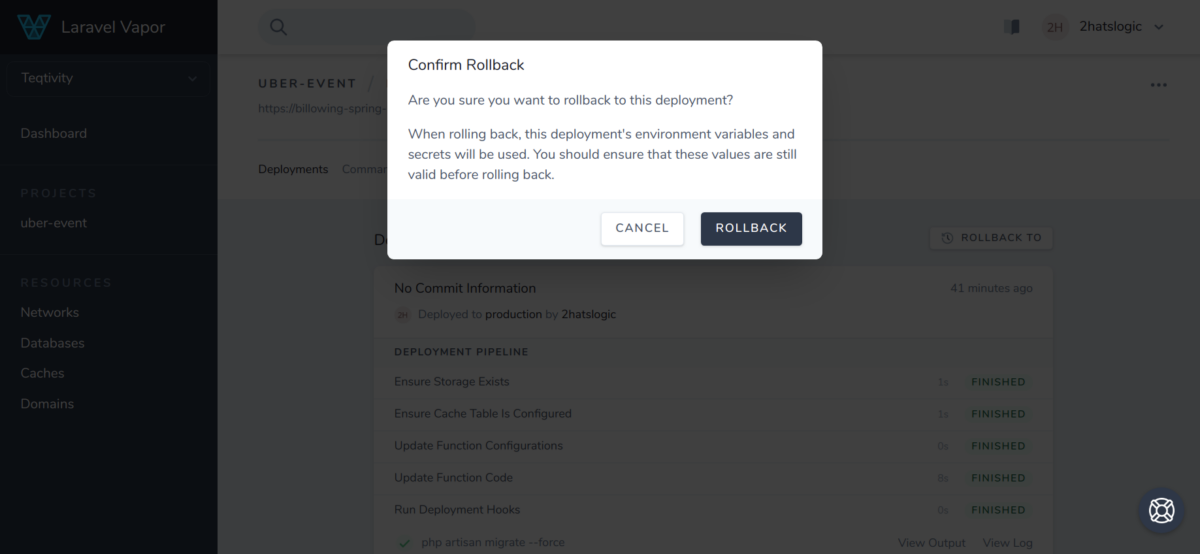
If you are having trouble with your current deployment you can immediately roll back to the previous deployment from the Vapor UI. Click on the previous deployment and click the ‘RollBack To’ button.
You can view the application using the vanity URL for the environment which will be generated after the first deployment. You can also run artisan commands and view logs from the Vapor UI for the environment you are using. Now let’s look at how to store user-uploaded files in the file system.
Add Storage
Since the application is serverless you cannot store files in the filesystem. All files should be stored in a cloud storage system, such as AWS S3. You need to add a storage key to the environment’s vapor.yml configuration. This value should be a valid S3 bucket name.
[code lang=”js”]id: 3958name: vapor-example
environments:
Production:
storage: vapor-example-bucket
build:
– ‘composer install –no-dev’
– ‘php artisan event:cache’
– ‘npm ci && npm run prod && rm -rf node_modules’
deploy:
– ‘php artisan migrate –force’[/code]
If your application accepts file uploads from end-users, these files should be streamed directly to Amazon S3 from your application’s frontend. On the docs, it says to upload using vapor. store helper. Read more on File Upload in Laravel Vapor. But using the storage facade you can process the file upload. The default storage driver will automatically be set to S3 in the web app. Checking the AWS S3 bucket will show the files that are uploaded.
Now let’s look at how to set up a Database for our application.
Creating Databases
Creating a database needs a network already provisioned to you. When you create a project in a region that does not contain any previous Vapor projects, Vapor automatically begins provisioning a network for you. If you do not have any networks you need to create a network in the same region as your application. You can now create a database instance.
Read more on why your application could be running slow because of Database Access Overhead in Vapor.
To create a database instance you can use the Vapor UI or from CLI command using
vapor database my-application-db
The command will prompt to select the performance class, maximum storage space, and database type. For small applications, it would be best to create a fixed publicly accessible database with 2vcpus and 4GB RAM.
After a database is created you can access it from the shell command using
vapor database:shell my-application-db
To attach a database to an environment, add the database name as the key to the environment’s configuration in your vapor.yml file and deploy your application.
[code lang=”js”]id: 3958name: vapor-example
environments:
Production:
storage: vapor-example-bucket
database: my-application-db
build:
– ‘composer install –no-dev’
– ‘php artisan event:cache’
– ‘npm ci && npm run prod && rm -rf node_modules’
deploy:
– ‘php artisan migrate –force’[/code]
You can scale the database from the Vapor UI to a higher-performance class if you want. Also, the database can be restored to any point of time from which the database was created. Now that you have the basic setup for a web application, you can add a domain to your Laravel Vapor application.
Domain
If you wish, you may purchase new domains directly in the Vapor UI. These domains are purchased using Amazon Route53’s existing domain registration services, so all purchased domains will belong to your linked AWS account.
If you already own a domain via Route53 or another domain registrar, you may create a DNS zone for the domain using the “Add Domain” button within the Vapor UI’s domain management screen.
Adding application as a sub-domain to Vapor is an issue we faced at this stage. Check out the link for more details.You also need to create a certificate using DNS validation via the Vapor UI. After that, you can add the domain key to the environment in the vapor.yml file
[code lang=”js”]id: 3958name: vapor-example
environments:
Production:
storage: vapor-example-bucket
database: my-application-db
domain: test-domain.com
build:
– ‘composer install –no-dev’
– ‘php artisan event:cache’
– ‘npm ci && npm run prod && rm -rf node_modules’
deploy:
– ‘php artisan migrate –force’
[/code]
After deployment, you can view the application using the domain name. Vapor will already set up a queue and the DynamoDB cache. You can configure these from Vapor UI or CLI. You also don’t need to set up anything to send Emails. The vapor will already set DKIM etc. for you if it’s managing your domain.
Conclusion
Vapor makes it super easy to deploy a Laravel application in a serverless environment. The more you use Vapor and get familiar with running serverless, the more you’ll appreciate Vapor. It takes care of a whole lot of wiring behind the scenes that you don’t need to worry about.
I recently deployed a Laravel application using Vapor. The deployment was very easy using Vapor. The application performed better than some of our similar projects deployed in AWS EC2. The cost was also lesser as Vapor bills depending on the application usage. The support from the Laravel team was good to help us resolve some difficulties faced during the use of Vapor.
Our Laravel Development services strive to give the best solutions for our clients and also to keep updated with the latest technologies. We hope this article will help you to minimize the issues of Vapor deployment. If You’re Still Facing Issues?? No worries, you can hire a Laravel developer or contact us for any help you may require in Laravel Development.


Related Articles