Greetings! I'm Aneesh Sreedharan, CEO of 2Hats Logic Solutions. At 2Hats Logic Solutions, we are dedicated to providing technical expertise and resolving your concerns in the world of technology. Our blog page serves as a resource where we share insights and experiences, offering valuable perspectives on your queries.
Quick Summary
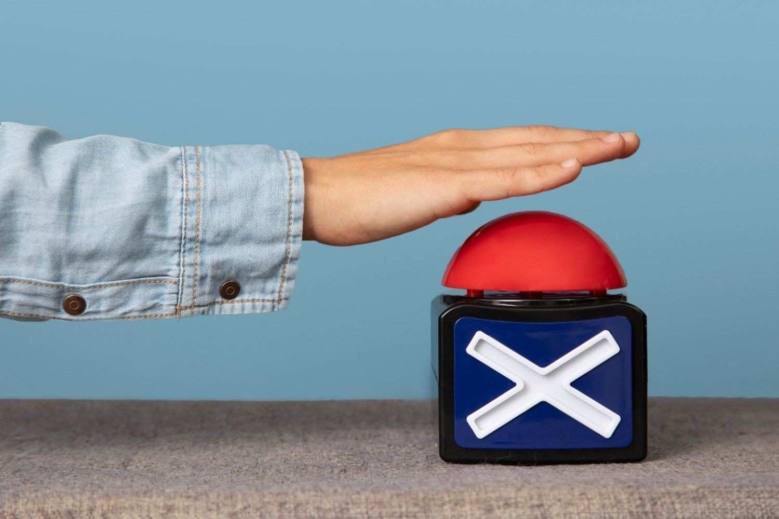
Canceling your Shopify subscription is easier than it seems. Log in to your Shopify admin account, click on your profile icon in the bottom-left corner, then go to “Settings” → “Plan and permissions.” Scroll down to find the “Close store” option. Select your reason for leaving, enter your password to confirm, and click the final “Close store” button. Remember to export your data first and consider alternatives like pausing your store for $9/month if you’re taking a break.
So you’re thinking about saying goodbye to Shopify? Whether you’re taking a break from e-commerce, moving to another platform, or just need to pause your subscription, this guide has you covered.
As e-commerce experts, we’ve helped dozens of merchants transition between platforms. We’ll walk you through how to cancel your Shopify subscription and everything you need to know about canceling your Shopify subscription.
Need Help Migrating Your Store? Let Our Experts Handle It For You
You’re absolutely right! Here’s the proper blog format :
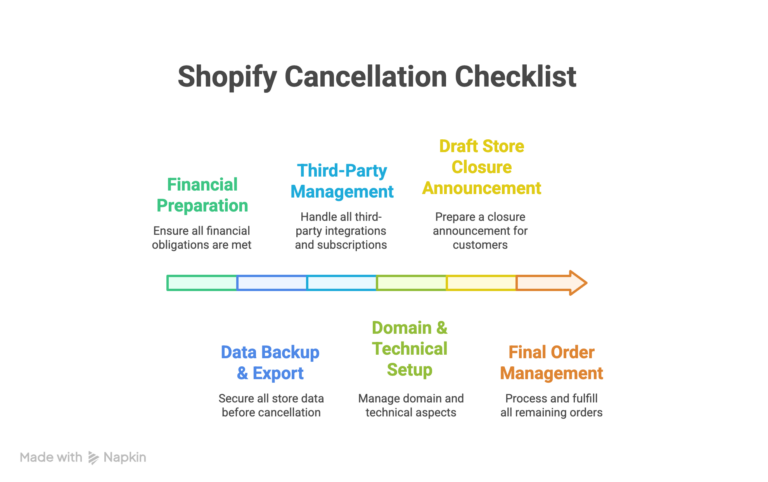
Essential Pre-Cancellation Checklist: Don’t Skip These Steps
Before clicking that cancel button, complete this comprehensive checklist to avoid costly mistakes and data loss. Each step includes time estimates and explanations.
Financial Preparation
Export billing history and invoices
- Go to Settings → Billing → Download all statements. Save PDF copies for tax records and potential disputes.
Screenshot your final account balance
- Document any outstanding charges before closure. Check for pending transaction fees or app charges.
Download Shopify Payments payout history
- Go to Settings → Payments → Export payout data. This is essential for accounting and tax filing.
Verify pending refunds or chargebacks
- These will still process after store closure. Note any disputes that need attention.
Data Backup & Export
Export complete product catalog
- Go to Products → Export → Include all variants, images, and descriptions. Save both CSV and any custom product data.
Download customer database
- Go to Customers → Export → Include contact info and order history. This is essential for email marketing on your new platform.
Export all order history
- Go to Orders → Export → Get complete transaction records. Include fulfillment status and customer notes.
Save discount codes and promotions
- Screenshot active codes and their usage statistics. Document automated discount rules.
Backup email templates and automation
- Copy abandoned cart emails and order confirmations. Note automation triggers and timing.
Third-Party Management
Cancel all paid app subscriptions
- Go to Apps → Manage each subscription individually. Download any app-specific data before canceling.
Export app data
- Save reviews, analytics, loyalty points, etc. Contact app developers for data export if needed.
Update payment methods
- Remove cards from apps that bill separately. Check for annual subscriptions that auto-renew.
Domain & Technical Setup
Transfer custom domain ownership
- If purchased through Shopify: Go to Domains → Transfer out. Update DNS settings with new provider and verify domain ownership transfer completion.
Document current SEO settings
- Screenshot meta titles, descriptions, and URL structures. Note any custom redirects you’ve set up.
Save theme customizations
- Download theme files if custom coded. Screenshot design customizations for reference.
Customer Communication
Draft store closure announcement
- Create email template for existing customers. Include timeline, refund policy, and contact info.
Update social media profiles
- Change bio links and post closure announcement. Direct followers to new platform if applicable.
Set up customer inquiry system
- Create auto-responder email for customer service. Set up alternative contact method for urgent issues.
Plan SEO redirect strategy
- Document important product and page URLs. Prepare 301 redirects for new platform.
Final Order Management (Time varies)
- Complete any “unfulfilled” orders. Process outstanding returns or exchanges.
Resolve gift card balances
- Honor existing gift cards or provide alternatives. Export gift card data for manual processing.
Handle subscription products
- Cancel recurring subscriptions properly. Notify subscription customers of changes.
Need Help with Data Migration? Our Experts Ensure Zero Data Loss
Before You Cancel Shopify Membership: Read This First
Before hitting that cancel button, there are a few important things to consider.
Pause vs. Cancel Shopify Membership: Know the Difference
Shopify offers a “pause” option that might be better than full cancellation if you’re just taking a temporary break. With the pause option, you’ll pay just $9/month instead of your regular subscription fee.
This keeps your store intact and ready to reactivate whenever you need it.
Also read:
What is Shopify and how it works?
How to use Shopify: A Beginner’s Guide to Getting Started.
How to Change Your Shopify Theme (Step-by-Step Guide)
How to Connect Etsy to Shopify: Full Integration Guide (2025)
Will I Still Be Charged if I Deactivate My Shopify Store?
No, once you deactivate your store, Shopify will stop charging you after your current billing cycle ends. However, any third-party apps with their own billing will need to be canceled separately.
If you’re on an annual plan, Shopify typically doesn’t offer refunds for unused months, so timing your cancellation is important.
Alternatives to Cancelling
Consider these options before you cancel Shopify membership fully:
- Pause & Build Plan: Keep your store at a reduced rate while you make improvements
- Temporary Closure: Hide your store from the public but keep everything intact
- Downgrade Your Plan: Switch to a cheaper tier like the $5/month Starter plan
Pro Tip: Backup Your Data Before Cancellation
This is absolutely critical! Before canceling, export:
- Theme files (if custom)
- Customer data
- Order history
- Product information
Overwhelmed by the Process? We’ll Cancel & Migrate Your Store Safely

How to Cancel Shopify Subscription (Step-by-Step)
Follow these straightforward steps to cancel your Shopify subscription without the headache:
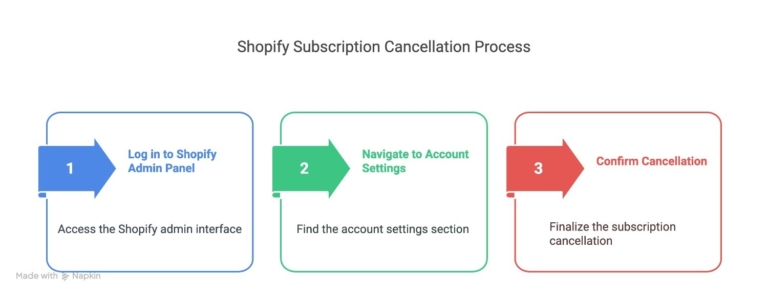
Step 1: Log in to Your Shopify Admin Panel
First things first, you need to access your store’s backend.
- Go to Shopify.com and click “Login“
- Enter your store address and credentials
- Make sure you’re logged in as the store owner (not a staff account)
Step 2: Navigate to Your Account Settings
This is where many merchants get lost, so follow closely:
- Click on your profile icon in the bottom-left corner of the screen
- Select “Settings” from the dropdown menu
- In the Settings menu, click on “Plan and permissions“
Step 3: Scroll Down to Find Cancellation Options
Now we’re getting to the part Shopify doesn’t make obvious:
- Scroll all the way down to the bottom of the Plan page
- Look for the section labeled “Close store“
- Click on “Close store” to begin the cancellation process
Step 4: Select Your Reason for Cancellation
Shopify wants to know why you’re leaving:
- Choose the most appropriate reason from their dropdown menu
- Be honest, this helps them improve their service
- You can add additional details in the comment box if needed
Get a free 30-minute consultation to review your e-commerce strategy and suggest cost-effective alternatives.
Step 5: Confirm Your Cancellation
The final step requires confirmation:
- Enter your password to verify it’s you
- Click “Close store” to confirm your decision
- Look for the confirmation email from Shopify
And that’s it! Your store is now scheduled for closure, and your billing will stop at the end of your current billing cycle.
What Happens When You Cancel Your Shopify Subscription?
Before we dive into the how to cancel Shopify subscription process, let’s understand what you’re saying goodbye to:
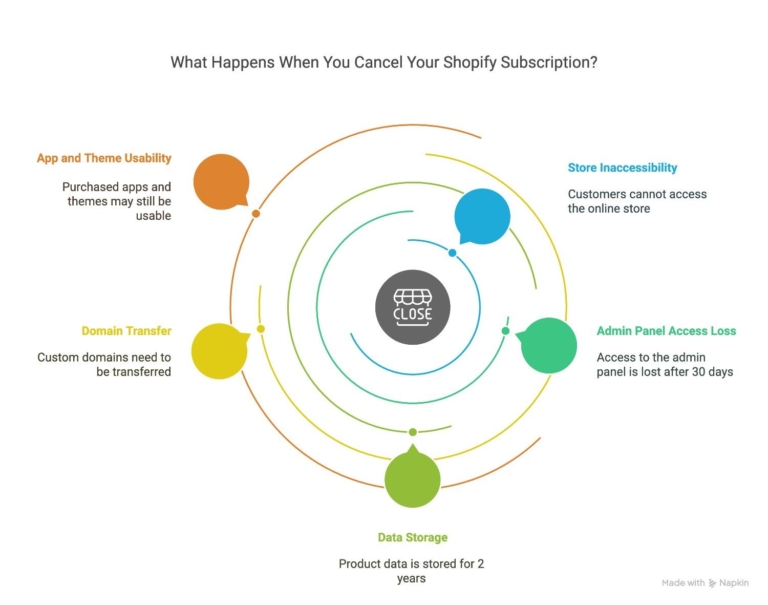
- Your online store becomes inaccessible to customers
- You lose access to the admin panel after 30 days
- Your product data remains stored for 2 years (you can export it first!)
- Any custom domain you purchased through Shopify will need to be transferred
- Apps and themes you purchased separately may still be usable elsewhere
How to Deactivate Your Shopify Store
Deactivating your Shopify store is actually the same process as canceling your subscription, Shopify uses the terms interchangeably.
Deactivation vs. Permanent Deletion
It’s important to understand the difference:
- Deactivation (what Shopify calls “Close store”): Stops your subscription and makes your store inaccessible to customers, but preserves your data for potential future reactivation
- Permanent Deletion: Completely removes all your store data and cannot be undone
What’s Preserved When You Deactivate?
When you deactivate your Shopify store:
- Product data is preserved for 2 years
- Customer information remains in Shopify’s database
- Custom themes and settings are saved
- Your store URL is reserved for you (if you want to come back)
What you lose access to immediately:
- Most admin features after 30 days
- Your storefront (customers will see a “Store unavailable” message)
- The ability to process orders
How to Delete a Shopify Account Permanently
If you want to completely delete your Shopify account and all associated data:
- First, follow the deactivation steps above
- Then contact Shopify Support directly and request permanent deletion
- Verify your identity when asked
- Confirm in writing that you understand the permanent nature of this action
What “Deleting” Really Means on Shopify
True account deletion means:
- All store data is permanently removed
- Customer information is purged from their systems
- You’ll need to create a brand new account if you ever return to Shopify
- Any custom domain purchases or third-party integrations may be affected
Legal, Billing, and Data Consequences
Be aware that deletion:
- Removes access to past transaction records you might need for taxes
- Cancels any pending refunds or payouts
- May affect your ability to dispute past charges
- Eliminates evidence of intellectual property ownership from your store
Common Issues When Canceling Shopify (And How to Solve Them)
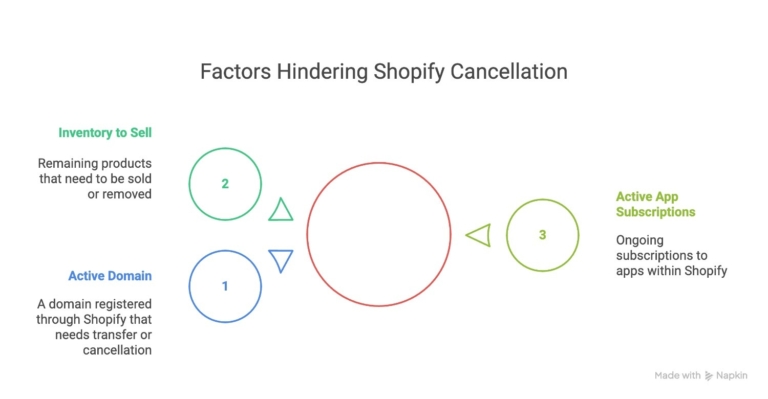
Problem: You Have an Active Domain with Shopify
If you purchased a domain through Shopify, you’ll need to
- Transfer it to another provider before canceling
- Or let Shopify know you want to keep it (additional fees apply)
Problem: You Still Have Inventory to Sell
Don’t cancel until you’ve:
- Sold remaining inventory
- Created a backup plan to sell elsewhere
- Exported your product data
Problem: You Have Active App Subscriptions
Remember to:
- Cancel third-party apps separately
- Check for annual subscriptions that might still be active
- Request refunds for recently renewed apps if applicable
What to Do After Canceling Your Shopify Subscription
After successfully canceling, make sure to:
- Save your store data (especially customer information)
- Download your sales history for tax purposes
- Inform your customers about your store closure or new location
- Update any business listings or social media profiles
- Cancel any connected services like payment processors
Pro Tip: Even after cancellation, keep the email address associated with your Shopify account active for at least 3 months. Important notifications about refunds or customer inquiries may still come through.
How to Unsubscribe From Shopify Emails
Getting too many emails from Shopify? Here’s how to manage them:
- Look for the “Unsubscribe” link at the bottom of any Shopify marketing email
- Or go to your Shopify admin → Settings → Notifications
- Uncheck the email types you don’t want to receive
- Save your preferences
Marketing Emails vs. Platform Notifications
Keep in mind there’s a difference between:
- Marketing emails: Promotions, features, tips (these are optional)
- Platform notifications: Order alerts, security updates (some may be required)
For a complete opt-out, visit Shopify’s email preference center (you’ll need to be logged in).
Conclusion: Need Help With Your E-commerce Journey?
Canceling Shopify doesn’t have to mean the end of your online selling adventure. At 2HatsLogic, we specialize in helping businesses find the right e-commerce setup for their unique needs.
Whether you’re looking for more cost-effective Shopify development solutions, need help migrating to a new platform, or want to explore headless commerce options that give you more flexibility and lower costs, our team is here to help.
Ready to explore better options? Contact our team today for a free consultation about your e-commerce future.
FAQ
Can I Cancel Shopify from Mobile?
Yes, you can cancel your Shopify subscription from the mobile browser by logging into your Shopify admin. However, the process is easier on desktop. The Shopify mobile app currently doesn't support cancellation directly.
Can You Reactivate Your Store Later?
Yes! Shopify makes reactivation easy
How Long Is Your Data Retained?
Shopify retains your store data for approximately 2 years after deactivation. After that period, it may be permanently deleted from their systems.
Table of contents
- Before You Cancel: Read This First
- How to Cancel Shopify Subscription (Step-by-Step)
- What Happens When You Cancel Your Shopify Subscription?
- How to Deactivate Your Shopify Store
- How to Delete a Shopify Account Permanently
- Common Issues When Canceling Shopify (And How to Solve Them)
- What to Do After Canceling Your Shopify Subscription
- How to Unsubscribe From Shopify Emails
- Conclusion: Need Help With Your E-commerce Journey?


Related Articles