Greetings! I'm Aneesh Sreedharan, CEO of 2Hats Logic Solutions. At 2Hats Logic Solutions, we are dedicated to providing technical expertise and resolving your concerns in the world of technology. Our blog page serves as a resource where we share insights and experiences, offering valuable perspectives on your queries.
Quick Summary
This guide walks you through setting up your Shopify store in 7 simple steps, from choosing a plan to launching your store. Perfect for complete beginners, you’ll learn how to add products, customize your theme, and set up payments. No tech experience is needed!
What’s holding your online store back from launching today?
Is it the fear of technical hurdles? The overwhelm of choosing between dozens of e-commerce platforms? Or maybe there is uncertainty about whether you can create something professional without hiring expensive developers.
These are the exact barriers we have helped entrepreneurs overcome at 2HatsLogic, where we’ve transformed store ideas into thriving Shopify businesses.
The truth is, Shopify has evolved to become remarkably beginner-friendly in 2025. But it’s important to have a clear roadmap to understand how Shopify works and what steps to follow.
In this step-by-step guide, we will share the exact process we use with our clients to go from complete beginners to launching professional stores that actually convert visitors into customers.
Let’s clear the path to your store launch, one simple step at a time.
What Is Shopify and Who Is It For?
Shopify is essentially an all-in-one e-commerce platform that lets you create an online store without needing to know how to code. Think of it as the “build-your-own-store” kit that handles all the complicated tech stuff behind the scenes.
Unlike building a website from scratch (which can take months and cost thousands), Shopify lets you launch a professional-looking store in days or even hours.
Who is Shopify perfect for?
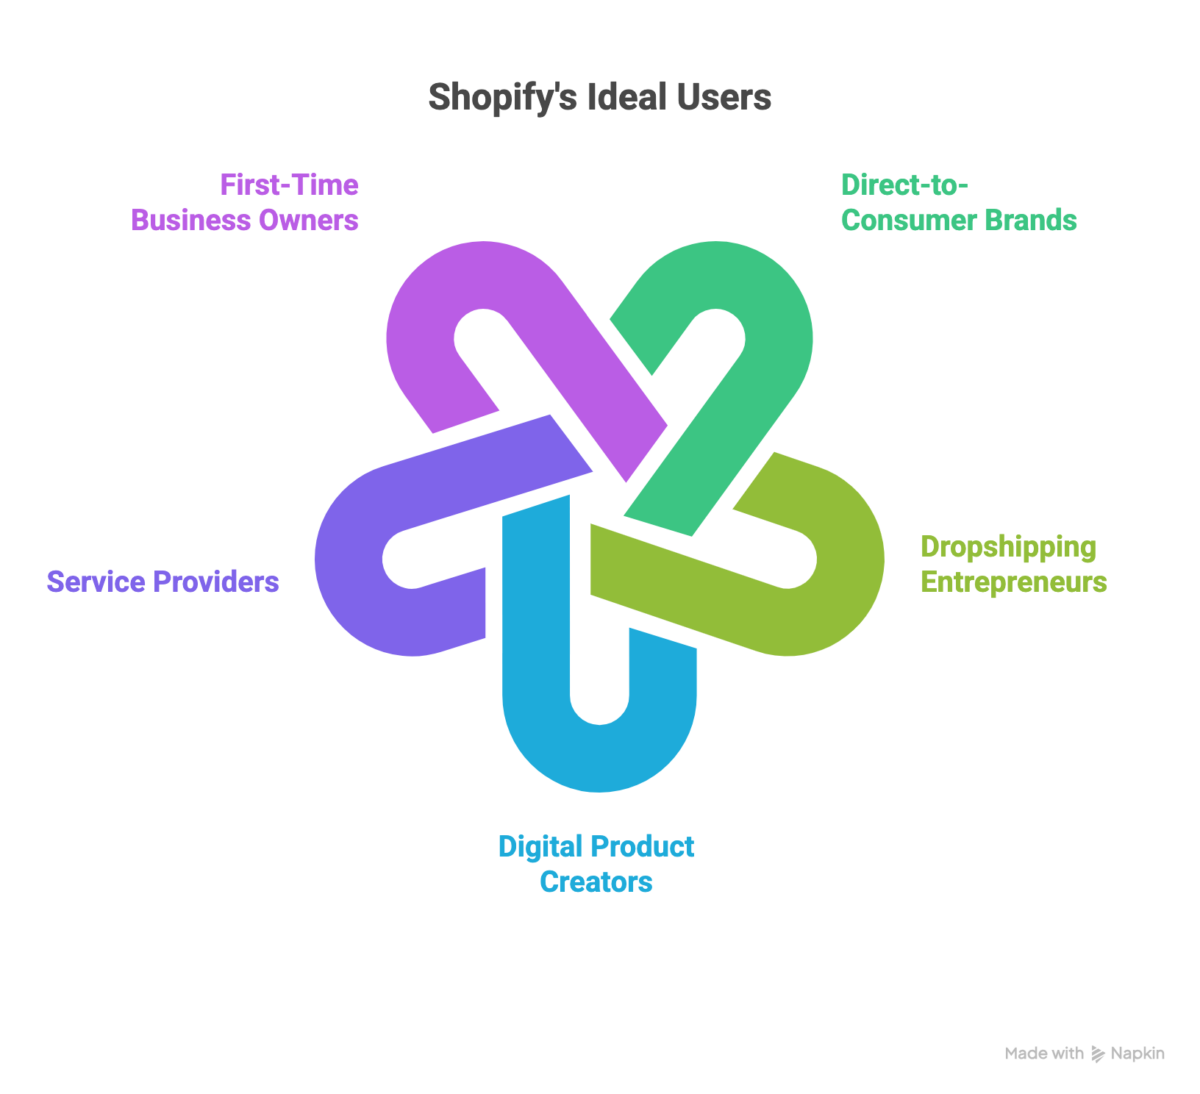
- Direct-to-consumer brands selling physical products
- Dropshipping entrepreneurs who don’t want to handle inventory
- Digital product creators selling ebooks, courses, or templates
- Service providers looking to sell packages or bookings online
- First-time business owners who need something simple and reliable
PRO TIP: Start with a free 3-day trial to explore all features before committing to a paid plan. You can extend this to 14 days by providing your email.
Launch Your Store with Shopify Experts
A Quick Look at the Shopify Dashboard
Before we dive into the setup, let’s get familiar with the Shopify dashboard, your command center for running your online store.

The main navigation menu includes:
- Home: Your store’s overview and recent activity
- Orders: Manage customer purchases and fulfillment
- Products: Add and organize your inventory
- Customers: View customer information and purchase history
- Analytics: Track sales, visitor behavior, and marketing performance
Additional sections you’ll use regularly:
- Apps: Add extra functionality to your store
- Sales channels: Connect to marketplaces like Facebook or Instagram
- Discounts: Create promotional codes and automatic discounts
- Settings: Configure your store’s payments, shipping, taxes, etc.
Step-by-Step: How to Use Shopify
Let’s break down the exact process of setting up your Shopify store into simple, actionable steps that anyone can follow, regardless of technical experience.
1. Choose a Shopify Plan
Shopify offers several plans depending on your business needs:
- Shopify Starter ($5/month): For selling through social media or existing websites
- Basic Shopify ($39/month): Perfect for new businesses with moderate sales volume
- Shopify ($105/month): For growing businesses with one retail location
- Advanced Shopify ($399/month): For larger businesses with advanced reporting needs
We recommend most beginners start with the Basic plan – it gives you all the essentials without overwhelming you with features you won’t use yet.
Compare all features on Shopify’s pricing page
2. Add Your First Products
Products are the heart of your store. Here’s how to add them:
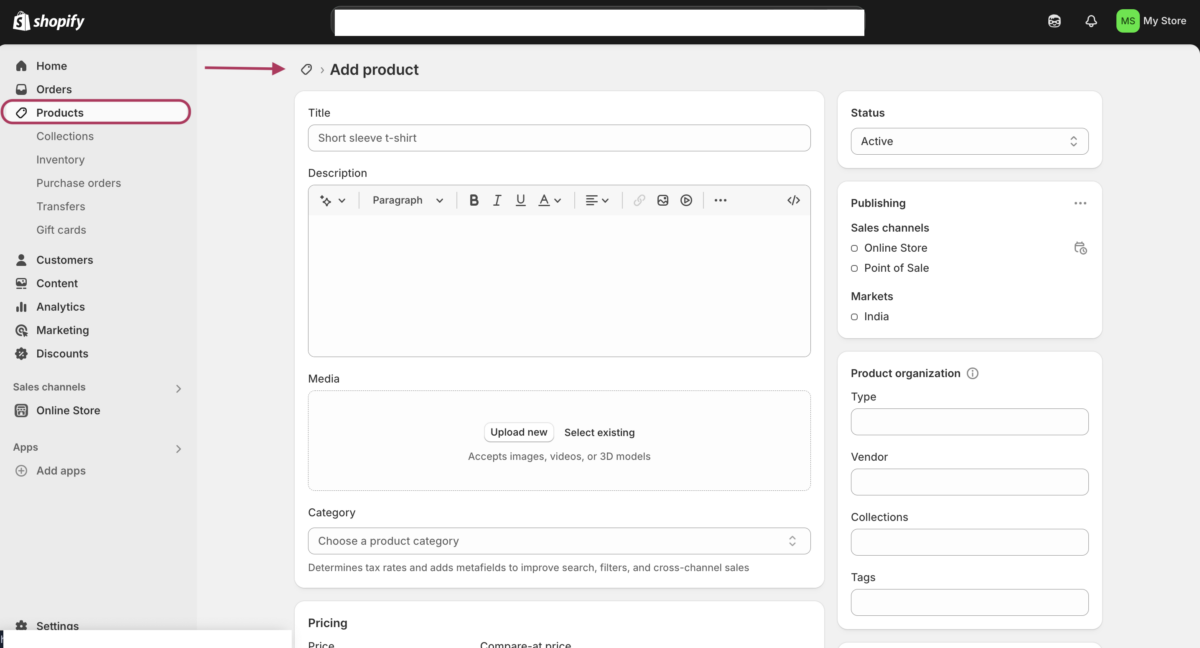
- From your dashboard, click Products > Add product
- Add a clear, descriptive title (what customers will see first)
- Write a detailed description explaining benefits, features, and specifications
- Set your price (and compare-at price if offering a discount)
- Add product images (at least 3-5 high-quality photos from different angles)
- Create variants if your product comes in different colors, sizes, etc.
- Set inventory tracking, shipping weight, and SKU information
PRO TIP: Organize related products into “Collections” (like “Summer Collection” or “Bestsellers”) to help customers find what they’re looking for faster.
3. Pick and Customize a Theme
Your theme determines how your store looks and feels to customers:
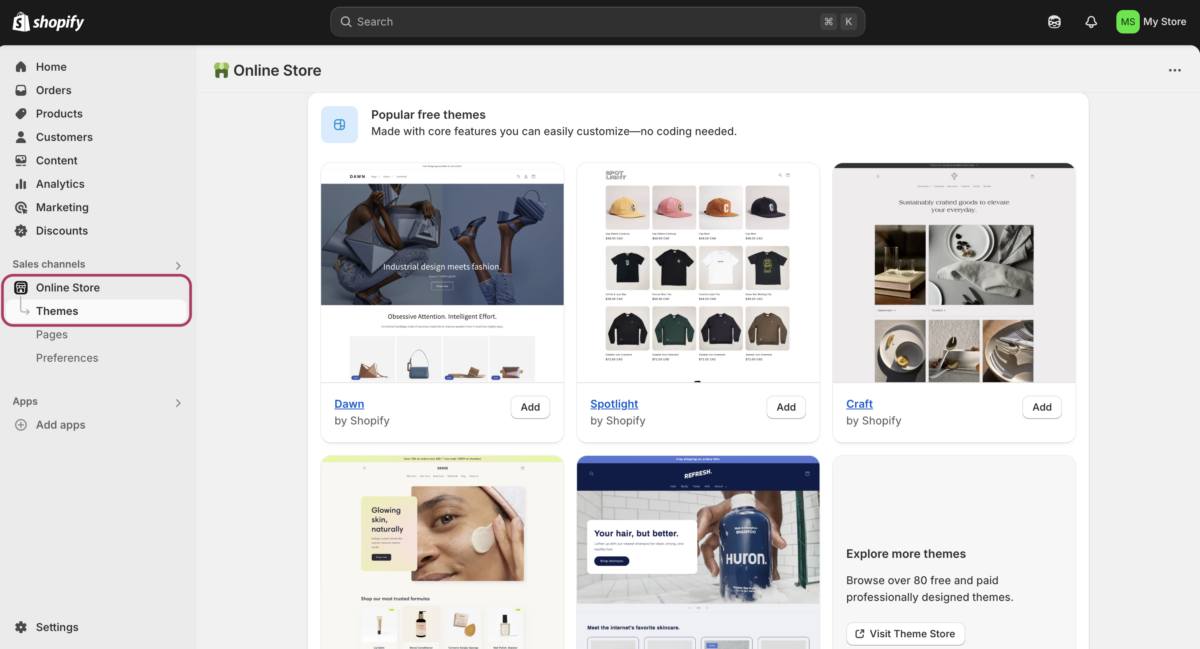
- Go to Online Store > Themes
- Click Explore free themes or Visit Theme Store for premium options
- Once installed, click Customize to open the theme editor
- Modify your homepage sections (hero banner, featured collections, etc.)
- Update colors and fonts to match your brand
- Add your logo and favicon
- Make sure to check how it looks on mobile (most of your traffic will be mobile!)
We can help you select and customize the perfect theme for your specific products
4. Set Up Payments
To get paid, you’ll need to configure your payment providers:

- Go to Settings > Payments
- Enable Shopify Payments for the lowest transaction fees (available in 17+ countries)
- Alternatively, set up PayPal, Stripe, or other payment gateways
- Complete your business and banking information
- Test your checkout process by making a test purchase (use the testing mode)
Important: Always test your entire checkout flow before launching to make sure customers can complete purchases without any hiccups.
5. Set Up Shipping
Shipping can make or break your customer experience:

- Navigate to Settings > Shipping and delivery
- Create shipping zones (locations where you’ll ship to)
- Set up shipping rates for each zone (flat rate, weight-based, or calculated)
- Consider offering free shipping at certain order values (e.g., “Free shipping on orders over $50”)
- Configure shipping carriers (USPS, FedEx, UPS, etc.) if using calculated rates
| Standard Shipping | Express Shipping | International | |
| Cost | $5.99 flat rate | $15.99 | $25.99+ |
| Delivery | 5-7 business days | 2-3 business days | 7-14 days |
| Tracking | ✓ | ✓ | ✓ |
| Insurance | For orders $100+ | Included | Included |
PRO TIP: Shipping costs are the #1 reason for cart abandonment. Consider building some shipping costs into your product prices so you can offer “free shipping” – customers love it!
6. Connect Your Domain
A professional domain name builds trust with customers:
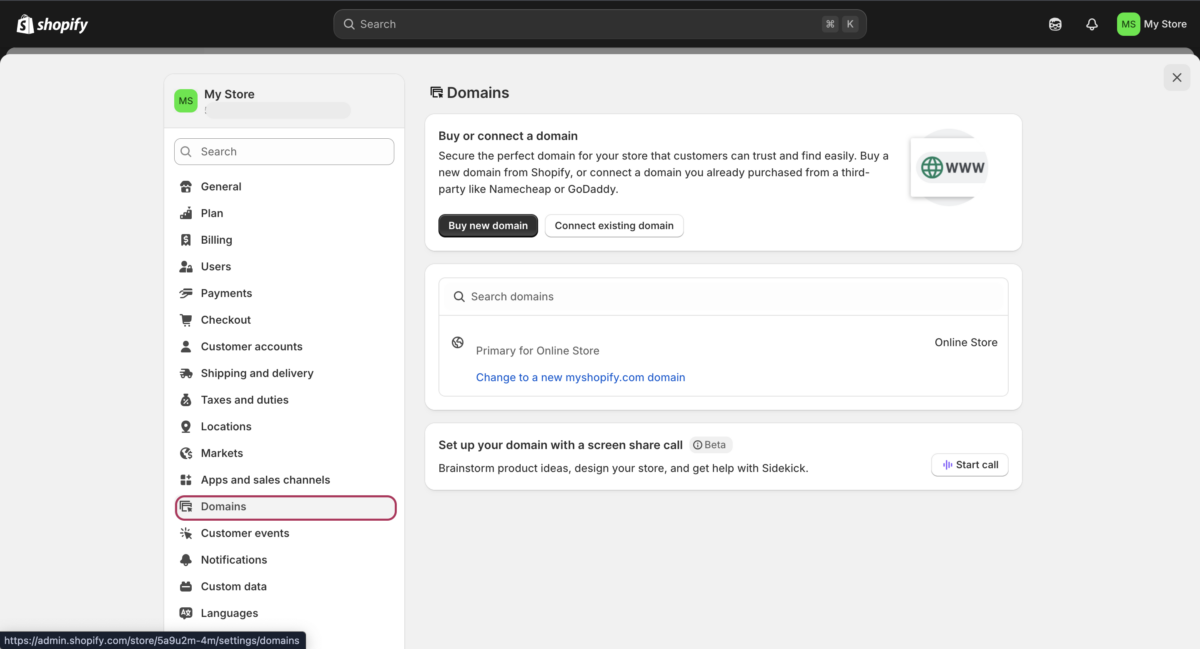
- Go to Settings > Domains
- Choose either:
- Buy a domain through Shopify (the simplest option, around $14-$20/year)
- Connect an existing domain you already own from another provider
- If connecting an existing domain, you’ll need to update DNS settings (Shopify provides instructions)
- Set up SSL certificate (automatic with Shopify domains)
After setup, your store will move from “yourstorename.myshopify.com” to “yourbrand.com”, much more professional!
7. Launch Your Store
Ready for the big moment? Here’s how to open your store to the world:
- Go through the Shopify Launch Checklist to ensure everything is ready
- Navigate to Online Store > Preferences
- Scroll down to the Password protection section
- Disable password protection by deselecting “Enable password.”
- Save changes
Congratulations! Your store is now live and ready to accept orders!
Related Blogs:
How to Cancel Your Shopify Subscription: A Complete Step-by-Step Guide
How to Remove “Powered by Shopify” From Your Footer
Common Beginner Problems & Quick Fixes
Even with Shopify’s user-friendly interface, beginners often hit these roadblocks. Here are the solutions we’ve used with our clients at 2HatsLogic:
Store Setup Issues
The most frustrating problems happen right at the beginning when your store won’t go live or customers can’t access it properly.
Problem: “My store still shows a ‘Coming Soon’ page.”
- Solution: Go to Online Store > Preferences > Password protection and uncheck “Enable password.”
- Why it happens: Shopify enables this by default during setup
Problem: “Customers can’t complete checkout.”
- Check these 3 things:
- The payment gateway is properly configured (Settings > Payments)
- Shipping rates are set up for the customer’s location (Settings > Shipping)
- No inventory tracking errors on products (Products > [Product] > Inventory)
Problem: “My domain isn’t working.”
- Solution: DNS changes take 24-48 hours to propagate globally
- Quick fix: Use your myshopify.com domain temporarily while DNS updates
Product & Inventory Problems
These issues can prevent customers from purchasing your products, even when everything else is working perfectly.
Problem: “Products showing as ‘out of stock’ when I have inventory.”
- Solution: Go to Products > [Product] > Inventory and check:
- “Track quantity” is enabled
- Quantity is greater than 0
- No negative inventory numbers
Problem: “Product images are blurry or pixelated.”
- Best practices:
- Upload images at least 2048×2048 pixels
- Use JPG for photos, PNG for graphics with text
- Keep file sizes under 20MB for faster loading
Problem: “Variant pricing isn’t showing correctly.”
- Solution: Each variant needs its own price set individually
- Go to: Products > [Product] > Variants and set the price for each option
Payment & Checkout Issues
Payment problems can instantly kill sales, so it’s crucial to identify and fix these issues quickly.
Problem: “Payment failed” errors for customers
- Most common causes:
- The customer’s card was declined (not a Shopify issue)
- Fraud filters are too strict (Settings > Payments > Fraud analysis)
- Address verification mismatch
Problem: “Shopify Payments isn’t available in my country.”
- Solutions:
- Use PayPal (available in 200+ countries)
- Set up Stripe manually
- Check Shopify’s list of supported payment gateways for your region
Theme & Design Problems
Visual and performance issues can hurt your professional image and drive customers away before they even browse your products.
Problem: “My theme changes disappeared.”
- What happened: You were editing an unpublished theme
- Solution: Go to Online Store > Themes and make sure you’re customizing the “Current theme.”
Problem: “Mobile site looks broken”
- Quick checks:
- Use Shopify’s mobile preview in the theme editor
- Test on actual mobile devices, not just desktop browser resize
- Check if custom CSS is interfering with mobile styles
Problem: “Site is loading very slowly.”
- Common fixes:
- Optimize images (use Shopify’s automatic compression)
- Remove unused apps
- Choose a faster theme (test loading speeds)
- Minimize custom code additions
SEO & Traffic Issues
If customers can’t find your store in search results, you’re missing out on the most valuable type of traffic: people actively looking for your products.
Problem: “My store isn’t showing up in Google.”
- Solutions:
- Remove password protection
- Submit sitemap to Google Search Console (automatic at yourstore.com/sitemap.xml)
- Wait 2-4 weeks for Google indexing
- Ensure each product has unique titles and descriptions
Problem: “Getting ‘Powered by Shopify’ in search results”
- Fix: Edit your homepage meta description in Online Store > Preferences
Quick Emergency Fixes
When something goes seriously wrong with your store, these steps can save you from panic and potential lost sales.
Store completely broken after making changes?
- Go to Online Store > Themes
- Click “Actions” on your current theme
- Select “Duplicate” to create a backup
- Revert to the previous theme version if available
Lost admin access?
- Use Shopify’s account recovery: yourstore.myshopify.com/admin/auth/recover
- Check your email for the password reset link
Customer complaint about the checkout not working?
- Test the entire checkout process yourself
- Try from different devices/browsers
- Check if it’s a specific payment method issue
- Contact Shopify support if confirmed (24/7 chat available)
Pro Tip: Before making major changes, always duplicate your theme as a backup. This 30-second step has saved countless stores from disasters.
Optional but Useful Features to Explore
Once your basic store is up and running, consider these enhancements:
Install Essential Shopify Apps
The Shopify App Store offers thousands of add-ons to extend your store’s functionality:
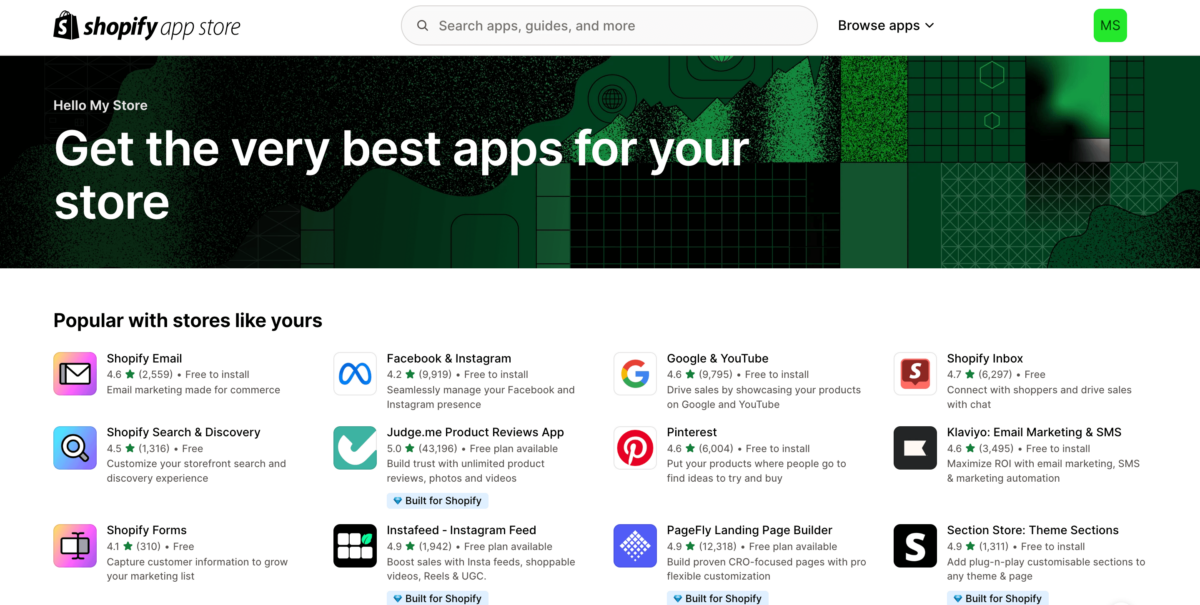
- Product Reviews: Build trust with customer testimonials
- Email Marketing: Capture leads and send automated emails
- SEO Optimizer: Improve your store’s search visibility
- Abandoned Cart Recovery: Recover potentially lost sales
- Upsell & Cross-sell: Increase average order value
Set Up SEO Basics
Help customers find your store through search engines:
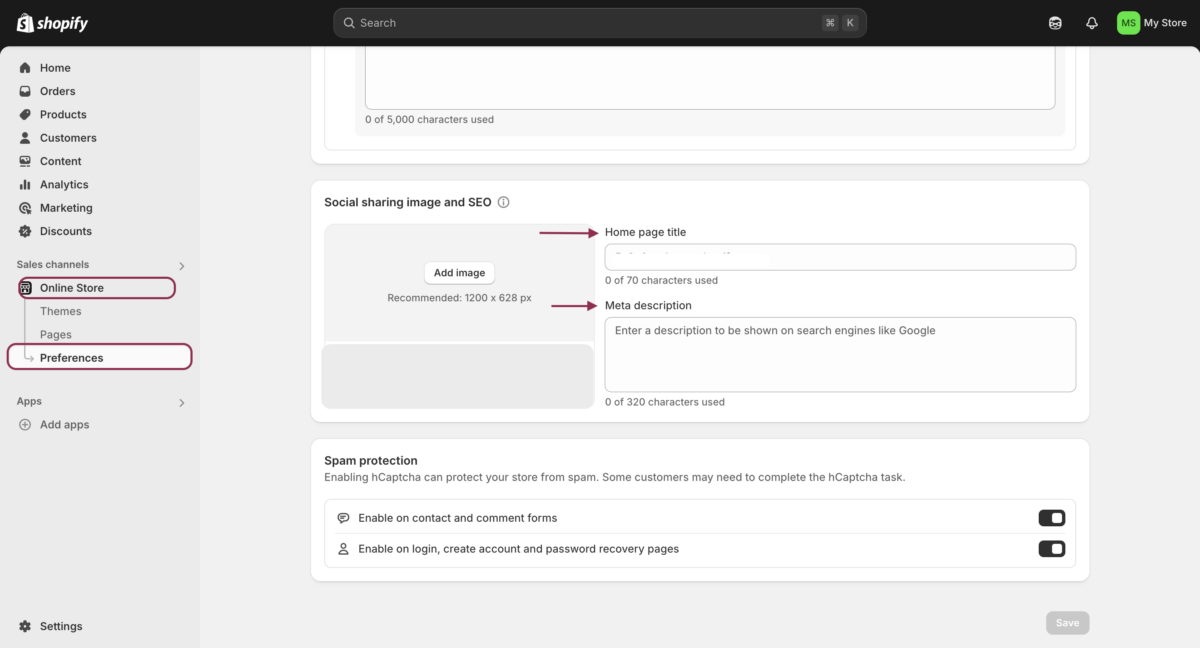
- Go to Online Store > Preferences to set the title and meta description
- For each product and collection, add unique descriptions and alt text for images
- Create a logical site structure with clear navigation
- Set up your sitemap and robots.txt (automatic with Shopify)
Connect Analytics
Track your store’s performance:
- Set up Google Analytics (Online Store > Preferences)
- Install Meta Pixel for Facebook/Instagram ad tracking
- Review Shopify’s built-in analytics regularly (Analytics section)
Add Legal Pages
Protect your business with these essential pages:
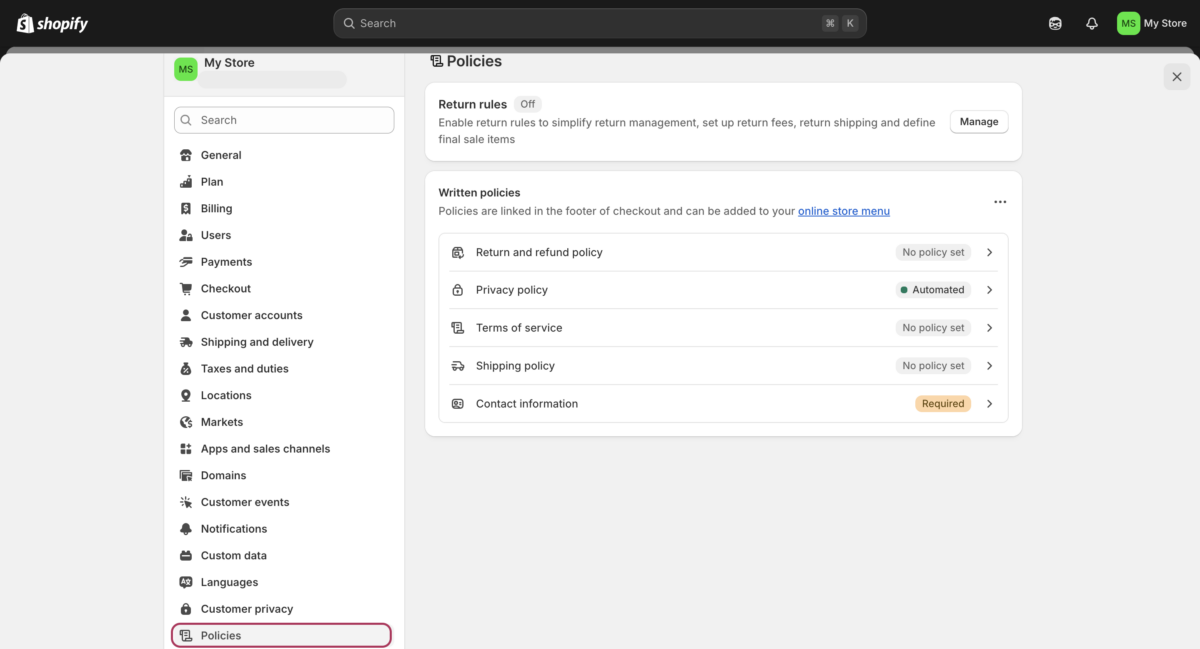
- Privacy Policy
- Terms of Service
- Shipping Policy
- Refund Policy
Shopify has generators for these pages under Settings > Policies
PRO TIP: While Shopify’s policy generators are helpful starting points, consider having them reviewed by a legal professional to ensure compliance with laws in your region.
Essential Marketing & SEO Setup for New Shopify Stores
Getting traffic to your new store is just as important as setting it up. Here’s how to lay the foundation for sustainable growth without getting overwhelmed.
SEO Fundamentals: Get Found in Google
Search engine optimization might sound technical, but these basic steps will help Google understand and rank your store without any coding knowledge required
Store-Wide Settings (Online Store > Preferences):
- Homepage title: Include your main keyword (50-60 characters)
- Good: “Premium Yoga Mats & Accessories | YogaBliss Store”
- Meta description: Compelling summary with keywords (150-160 characters)
- Good: “Discover eco-friendly yoga mats, blocks, and accessories. Free shipping on orders over $75.”
Product Optimization:
- Include target keywords in product titles naturally
- Write descriptions for humans first, search engines second
- Add descriptive alt text to all product images
What Shopify handles automatically:
- SSL certificates and mobile responsiveness
- Site speed optimization and XML sitemaps
- Rich snippets for products
Essential Analytics Setup
Understanding your visitors and their behavior is crucial for making smart business decisions and improving your store’s performance over time.
Google Analytics Integration
- Create an account at analytics.google.com
- Go to Online Store > Preferences in Shopify
- Paste your Google Analytics ID
- Enable Enhanced Ecommerce tracking
Google Search Console
- Go to search.google.com/search-console
- Add your domain and verify via Google Analytics
- Submit sitemap: yourstore.com/sitemap.xml
Key metrics to watch: Conversion rate by source, average order value, cart abandonment rate
Social Media & Email Marketing Basics
Building direct relationships with your customers through social media and email will become your most valuable traffic sources as your business grows.
Facebook & Instagram Shop
- Install the Facebook & Instagram app from the Shopify App Store
- Connect your business Facebook page
- Sync product catalog for social selling
Email Collection Strategy
Building an email list from day one gives you a direct line to your customers that you own, unlike social media followers.
Essential capture points:
- Exit-intent pop-up (offer 10% discount)
- Newsletter signup in the footer
- Post-purchase follow-up emails
Recommended platforms:
- Klaviyo (free up to 250 contacts)
- Mailchimp (free up to 500 contacts)
- Shopify Email ($1 per 1000 emails)
Basic Email Automation
Set up these automated email sequences once, and they’ll work 24/7 to nurture leads and recover lost sales.
Welcome series (3 emails):
- Welcome + brand story
- Best-selling products showcase
- Customer testimonials
Abandoned cart recovery (3 emails):
- Gentle reminder (1 hour delay)
- Social proof + urgency (24 hours)
- Last chance with a discount (72 hours)
Content Marketing Essentials
Creating valuable content helps potential customers discover your products naturally while establishing your expertise in your industry.
Blog Strategy
Use Shopify’s built-in blog for:
- “How to choose the right product” guides
- Product care and maintenance tips
- Customer success stories
Goal: 2 blog posts per month minimum with internal links to relevant products
Pro Tip: Focus on one marketing channel at a time. Master email marketing first, then add social media, then paid advertising. Trying everything at once leads to mediocre results across all channels.
Remember: SEO and marketing are long-term investments. Focus on creating value for your customers, and the rankings will follow.
Advanced Shopify Tips for Long-Term Success
After helping numerous Shopify beginners through 2HatsLogic, here are our most impactful strategies for building a thriving store:
Smart Business Strategy Tips
The foundation of every successful Shopify store starts with smart strategic decisions that set you up for sustainable growth from day one.
Start Small, Scale Smart
- Begin with 5-10 products: Focus on quality over quantity
- Test one traffic source: Master email marketing before adding social media ads
- Keep pricing simple: Avoid complicated discount structures initially
- Build trust systematically: Clear About Us page, secure badges, and customer testimonials
Pricing Psychology That Works
- The Rule of 3: Always show three pricing options (customers typically choose the middle option)
- Charm pricing: $19.99 converts better than $20.00 for products under $100
- Bundle strategy: Create bundles that save customers 15-20% vs buying individually
- Free shipping threshold: Set it 10-15% above your average order value to increase cart size
Conversion Optimization Secrets
Once your store is live, these proven techniques will help you turn more visitors into paying customers and increase your average order value.
Product Page Optimization
- Multiple angles: Show your product from at least 5 different angles
- Scale photos: Include images showing size compared to common objects
- Lifestyle context: Show products being used in real situations
- Social proof: Display reviews prominently above the fold
Checkout Optimization
- Guest checkout: Always enable this option (reduces cart abandonment by 20%+)
- Progress indicators: Show customers how many steps remain
- Security badges: Display payment security logos near the checkout button
- Multiple payment options: Offer PayPal, Apple Pay, and Google Pay alongside credit cards
Mobile-First Design Principles
- Touch-friendly buttons: Minimum 44px height for mobile buttons
- Simple navigation: Limit main menu to 5-7 categories maximum
- Fast loading: Optimize images to load in under 3 seconds
- One-handed use: Place important buttons within thumb reach
Inventory & Operations
Efficient operations and smart inventory management are what separate profitable stores from those that struggle with cash flow and customer satisfaction.
Smart Inventory Management
- ABC analysis: Focus 80% of your attention on your top 20% of products
- Seasonal planning: Order inventory 2-3 months before peak seasons
- Buffer stock: Keep a 30-day buffer for best-selling items
- Dead stock monitoring: Review and discount items that haven’t sold in 60+ days
Customer Service Excellence
- Response time goal: Aim to respond to customer inquiries within 2 hours during business days
- FAQ page: Address the top 10 questions you receive to reduce support tickets
- Order tracking: Proactively send shipping updates to reduce “where’s my order” emails
- Return policy: Make it clear and generous (increases trust and sales)
Marketing & Growth Strategies
Building a sustainable traffic and customer acquisition system requires focusing on the marketing channels that deliver the highest return on investment.
Email Marketing That Converts
- Welcome series: 3-email sequence introducing your brand story and best products
- Abandoned cart recovery: 3-email series with 10%, 15%, then 20% discount
- Post-purchase upsell: Recommend related products 3-7 days after delivery
- Win-back campaign: Re-engage customers who haven’t purchased in 90+ days
Content Marketing for Product Discovery
- Buying guides: Create “How to choose the best [product type]” content
- Problem-solving content: Address pain points your products solve
- Behind-the-scenes: Show your team, production process, or company values
- User-generated content: Feature customer photos and testimonials
Social Proof Strategies
- Review incentives: Offer a 5-10% discount for leaving honest reviews
- Photo reviews: Encourage customers to upload photos with their reviews
- Social media integration: Display Instagram feed on your homepage
- Trust signals: Show customer count, years in business, or certifications
Common Mistakes to Avoid
Learning from the mistakes of others can save you months of frustration and thousands of dollars in lost revenue.
Technical Mistakes
- Choosing overly complex themes: Simpler themes often convert better and load faster
- Neglecting mobile optimization: Over 70% of Shopify traffic is mobile
- Ignoring site speed: Even a 1-second delay can reduce conversions by 7%
- Poor image optimization: Unoptimized images slow down your entire site
Business Strategy Mistakes
- Competing only on price: Build value through service, quality, or experience
- No clear value proposition: Customers should understand your benefit within 5 seconds
- Inconsistent branding: Use the same fonts, colors, and tone across all touchpoints
- Neglecting customer retention: It costs 5x more to acquire new customers than to retain existing ones
Marketing Mistakes
- Trying every channel: Focus on mastering 1-2 marketing channels first
- Generic product descriptions: Write specific, benefit-focused copy for each product
- No email list building: Start collecting emails from day one, even with zero sales
- Ignoring analytics: Make decisions based on data, not assumptions
Performance Monitoring
Data-driven decision making is what separates successful store owners from those who rely on guesswork and gut feelings.
Weekly KPIs to Track
- Conversion rate by traffic source: Identify your best-performing channels
- Average order value: Track the impact of upselling and bundling strategies
- Cart abandonment rate: Benchmark against the 70% industry average
- Customer lifetime value: Measure long-term customer worth
Monthly Business Reviews
- Top-performing products: Double down on winners
- Traffic source analysis: Invest more in channels that convert
- Customer feedback analysis: Identify product or service improvements
- Competitor research: Stay aware of market changes and opportunities
Pro Tip: Success with Shopify isn’t about perfection from day one. It’s about consistent improvement based on real customer feedback and data. Start simple, test everything, and scale what works.
REAL SUCCESS STORY
One of our clients at 2HatsLogic started with just 3 products on a Basic Shopify plan. By focusing on excellent product photography and customer service, they reached $10K in monthly sales within 90 days, all without spending a fortune on advertising.
You’ve Got This!
Starting an online store might seem daunting, but Shopify has truly democratized e-commerce. You don’t need technical skills, a huge budget, or years of experience to create a professional store that converts visitors into customers.
Remember these key takeaways:
- Start with the essentials: good products, clear photos, and simple navigation
- Test your store thoroughly before launching (especially the checkout process)
- Begin marketing your store even before you launch to build anticipation
- Use Shopify’s built-in tools to learn what’s working and what isn’t
- Improve continuously based on real customer feedback
The most important thing is to take action. Your store won’t be perfect at launch, and that’s okay! The businesses that succeed are the ones that start imperfect but keep improving.
Contact us today for a free 30-minute consultation to discuss how we can help grow your Shopify business!
FAQ
How long does it take to learn Shopify?
The basics can be learned in an afternoon. Most beginners can set up a functional store in 1-3 days. Mastering all features typically takes 2-4 weeks of regular use.
Is Shopify better than Wix or WooCommerce?
Shopify is purpose-built for eCommerce, making it more robust than Wix for serious selling. Compared to WooCommerce, Shopify is much easier for beginners since you don't need to manage hosting or security updates.
Do I need a developer to use Shopify?
Not at all! Shopify is designed for non-technical users. You only need a developer if you want highly customized functionality beyond what themes and apps provide.
Is Shopify beginner-friendly?
Absolutely. The platform has evolved specifically to be accessible to beginners while still offering advanced features as you grow. Their 24/7 support is also excellent for newcomers.
Table of contents
- What Is Shopify and Who Is It For?
- A Quick Look at the Shopify Dashboard
- Step-by-Step: How to Use Shopify
- Common Beginner Problems and Quick Fixes
- Optional but Useful Features to Explore
- Essential Marketing & SEO Setup for New Shopify Stores
- Advanced Shopify Tips for Long-Term Success
- You've Got This!


Related Articles