Greetings! I'm Aneesh Sreedharan, CEO of 2Hats Logic Solutions. At 2Hats Logic Solutions, we are dedicated to providing technical expertise and resolving your concerns in the world of technology. Our blog page serves as a resource where we share insights and experiences, offering valuable perspectives on your queries.
QUICK SUMMARY
Adding products to Shopify takes just 7 steps: navigate to Products → Add product, add title/description, upload images, set pricing, manage inventory, create variants, choose sales channels, and organize into collections.
Need bulk uploading? Use CSV imports for 50+ products.
Adding products to Shopify isn’t just an administrative task; it’s a strategic opportunity most store owners miss.
The way you structure your product data directly impacts your conversion rates, SEO performance, and operational efficiency.
After optimizing over 50 Shopify stores, we have identified exactly what separates high-converting product listings from those that gather digital dust.
Let’s cut to the chase: you need to get products into your Shopify store quickly and correctly. This guide walks through every step of the process, from basic single products to complex inventories with hundreds of SKUs.
Where Do You Add Products in Shopify?
Before diving into the nitty-gritty, let’s get oriented with where everything lives in your Shopify account.
When you log into your Shopify admin dashboard, you’ll see a sidebar menu on the left. This is your command center for everything store-related.
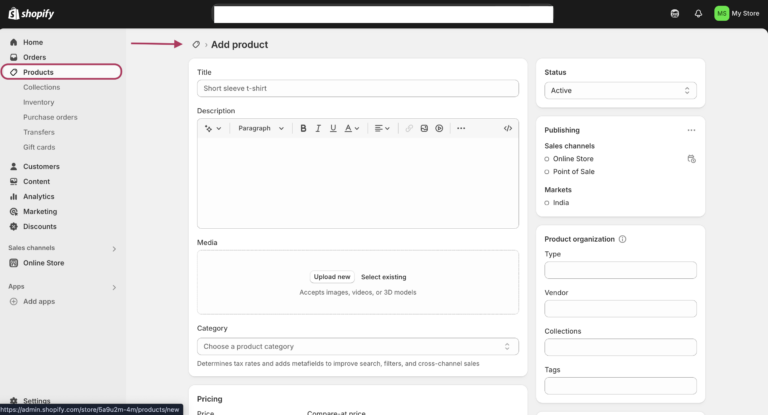
To add products, you’ll focus on the “Products” section. Click on it, then hit the big blue “Add product” button in the top-right corner.
But wait, what’s the difference between products, collections, and pages?
Products: Individual items you sell (a t-shirt, an ebook, a service package)
Collections: Groups of products (Summer Collection, Bestsellers, Under $50)
Pages: Content pages like About Us, Contact, FAQs (not directly for selling)
Pro Tip: Think of collections as the aisles in your store, and products as the items on the shelves. Pages are more like your store’s information booth.
Step-by-Step: How to Add a Product
Let’s break down the process into manageable steps. We’ll walk you through exactly what I do when setting up products for my clients.
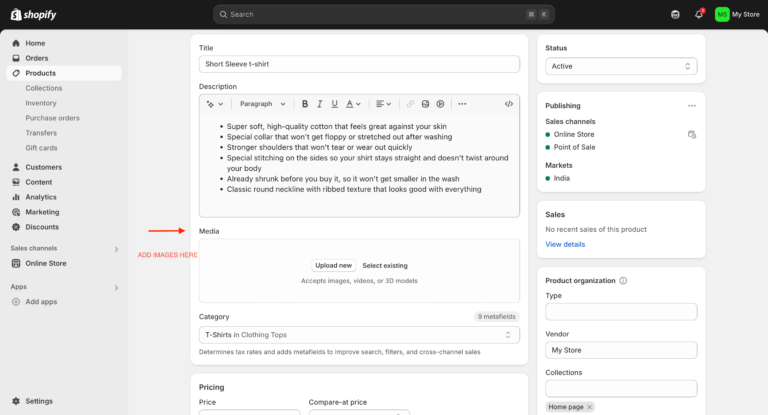
1. Add Product Title and Description
After clicking “Add product,” you’ll see a form with various fields. Start with the basics:

Title: This is what customers see first, so make it clear and searchable.
Good example: “Organic Cotton Crew Neck T-Shirt – Black”
Bad example: “T-shirt #A1254”
Description: Here’s where you sell your product with compelling copy.
Your description should:
- Address customer pain points
- Highlight unique benefits (not just features)
- Use short paragraphs with plenty of line breaks
- Include bullet points for specifications
Warning: Don’t copy descriptions from manufacturers or competitors! Google penalizes duplicate content, and you’ll miss opportunities to showcase your unique value.
2. Add Product Images and Videos
Images can make or break your sales. Here’s what works best:
- Image dimensions: 2048 x 2048 pixels is ideal (square format gives you flexibility)
- File type: .jpg or .png (use .png if you need transparent backgrounds)
- Multiple angles: Front, back, side, detail shots, and lifestyle images showing the product in use
To add images:
- Click the image area or “Add media.”
- Upload from your computer or choose from your media library
- Drag to reorder (first image becomes the thumbnail)
- Add ALT text for each image (describe what’s in the image for accessibility and SEO)
Adding video: Click “Add media” → “Add video” → paste a YouTube or Vimeo link, or upload directly.
3. Set the Price and Cost
In the Pricing section, you’ll find several important fields:

Price: What customers pay
Compare at price: Original price (for showing discounts)
Cost per item: What you pay (for profit calculations)
This 3-pack of organic soaps that we added for a client shows the power of smart pricing:
- Price: $24.99
- Compare at price: $29.99 (creates a sense of savings)
- Cost per item: $8.50 (helps track a 66% profit margin)
4. Manage Inventory
Proper inventory management prevents overselling and helps track performance:
- SKU (Stock Keeping Unit): Your internal product code (e.g., BLK-TSHIRT-M)
- Barcode: UPC, ISBN, or other standardized code
- Track quantity: Toggle on to automatically update inventory when orders come in
- Continue selling when out of stock: Enable backorders or pre-orders
Quick Tip: Create a consistent SKU system. For example, use product type + color + size (TSHIRT-BLK-M). This seems small, but it saves massive headaches as your inventory grows!
5. Set Product Variants
Selling a product in different sizes, colors, or materials? That’s where variants come in.

To add variants:
- Scroll to the “Variants” section
- Click “Add options” (Size, Color, Material, Style, etc.)
- Enter values separated by commas (Small, Medium, Large)
- Click “Done” then “Save”
For multiple options (like size AND color), add another option, and Shopify will create all combinations.
When working with a fashion client last year, we created 60 variants (5 sizes × 6 colors × 2 styles) with just three option fields. Each variant can have:
- Its price
- Its inventory tracking
- Its image
6. Choose Sales Channels
Your product can appear in multiple places:
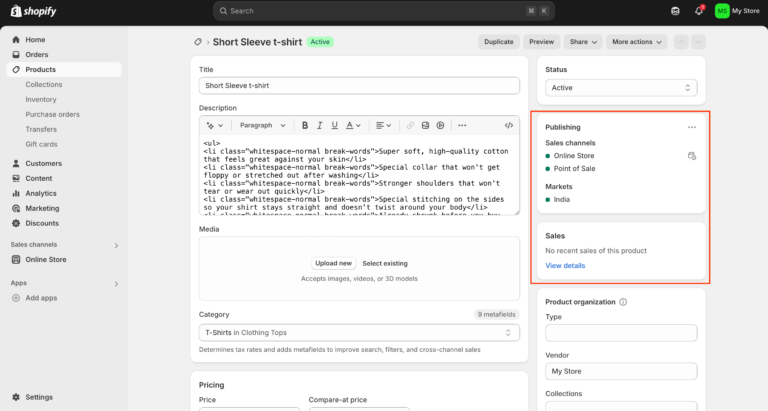
- Online Store: Your Shopify website
- Point of Sale: Physical store locations
- Buy Button: Embedded on external websites or blogs
- Facebook/Instagram Shop: Social selling
- Google Shopping: Product listings in Google search
Simply check the boxes for where you want your product to appear.
7. Organize with Product Collections
Collections help customers find what they’re looking for. There are two types:
Manual collections: You add products individually (good for curated collections like “Staff Picks”)
Automated collections: Products are added automatically based on conditions like:
- Product title contains “organic”
- The price is less than $50
- Vendor is “Acme Co.”
- Tags include “summer”
To add a product to a collection:
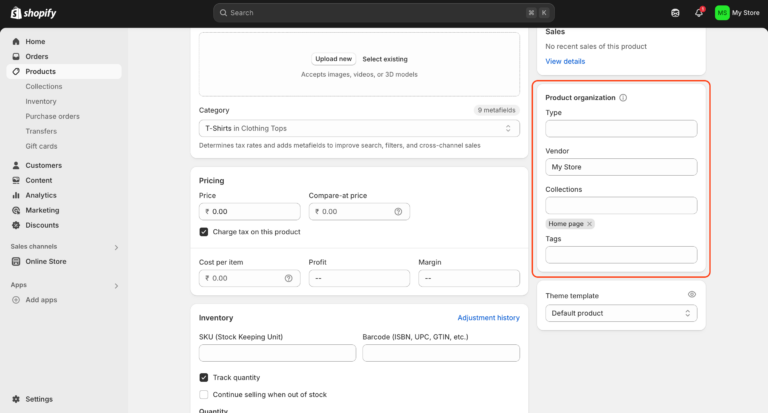
- Go to the “Product organization” section
- Under “Collections,” click the search box
- Select existing collections or create a new one
- Save the product
Pro Strategy: Use tags liberally! Tags help with automated collections, internal organization, and some themes use them for filtering. For example, a black t-shirt might have tags: black, cotton, tshirt, summer, basics, mens.
How to Add Products in Bulk
Got more than 50 products? Save time with bulk uploading:
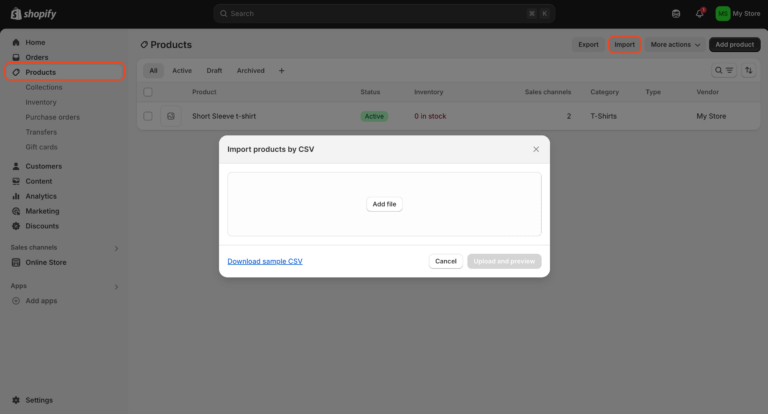
- Go to Products → Import
- Download the CSV template
- Fill in your product data (Excel or Google Sheets work well)
- Upload the completed file
The CSV method is perfect for:
- Migrating from another platform
- Launching with a large catalog
- Updating inventory or prices across many products
What’s in the CSV file?
- Basic fields: Handle (unique identifier), Title, Body HTML (description), Vendor
- Variant info: Option1 Name, Option1 Value (and so on for multiple options)
- Inventory: SKU, Barcode, Inventory Qty
- Pricing: Price, Compare At Price, Cost Per Item
- Images: Image Src (URL), Image Position, Alt Text
Time-Saving Hack: Need to create the CSV quickly? Use ChatGPT or similar AI tools to format your product data into the right CSV structure, just make sure to verify the output!
Common Mistakes to Avoid
After setting up hundreds of Shopify stores, here are the mistakes I see most often:
| Mistake | Why It Matters | How to Fix |
| Skipping product descriptions | Hurts SEO and conversion rates | Write at least 150 words describing benefits and features |
| Poor-quality images | Decreases customer trust | Invest in professional photography or use mockup tools |
| Ignoring SEO fields | Reduces organic traffic | Fill out SEO title, description, and URL handle |
| Not testing the customer view | May miss display issues | Always preview products before publishing |
Tips to Make Your Product Pages Convert Better
Want to turn browsers into buyers? Here’s what works for our highest-converting client stores:
- Use the rule of thirds for images: Main product image, lifestyle shots showing the product in use, and detail/feature closeups.
- Add “proof elements”:
- Reviews and ratings
- Customer photos
- “As featured in” logos
- Certification badges
- Create urgency:
- “Only 5 left in stock” notifications
- Limited-time offers
- “Back in stock” notifications for popular items
- Optimize for mobile:
- Most Shopify traffic is mobile
- Test your product pages on phones
- Make sure buttons are large enough to tap
Conversion Tip: “ou don’t sell products, you sell solutions to problems. Make sure your product description clearly states what problem your product solves!
Add Products Like a Pro
Adding products to your Shopify store is straightforward once you get the hang of it. Remember these key principles:
- Quality over quantity: A few well-presented products sell better than dozens of poorly presented ones.
- Be thorough: Fill out every field for the best customer experience and SEO performance.
- Think like a customer: What would you want to know before buying this product?
- Update regularly: Refresh descriptions, add new images, and optimize based on performance data.
Creating great product listings takes time, but it’s an investment that pays off in higher conversion rates and fewer customer questions.
Need help getting your products online? At 2HatsLogic, we specialize in Shopify product setup and optimization. Whether you have 10 products or 10,000, our team can help you get them online quickly with optimized listings that convert. Contact us today for a free consultation, and let’s get your products selling!
FAQ
Can I add digital products?
Yes! When adding the product, uncheck "This is a physical product" and you'll see options for digital file uploads. You can set download limits and expiry times.
Can I hide products until I'm ready to launch?
Absolutely. Either deselect all sales channels or set the product status to "Draft" instead of "Active."
How do I add products to a specific page or collection?
Add the product to a collection first, then you can feature that collection on any page using section settings in your theme editor.
Can I use AI to generate product descriptions?
Yes, but with caution. AI tools can help with formatting and ideas, but you should always review and personalize the content to match your brand voice and include specific product details.
How many products can I add to my Shopify store?
Technically, there's no limit. However, performance may be affected with extremely large catalogs (50,000+ products). Most themes perform optimally with up to 10,000 products.


Related Articles