Greetings! I'm Aneesh Sreedharan, CEO of 2Hats Logic Solutions. At 2Hats Logic Solutions, we are dedicated to providing technical expertise and resolving your concerns in the world of technology. Our blog page serves as a resource where we share insights and experiences, offering valuable perspectives on your queries.

QUICK SUMMARY
Creating a Shopify website takes 8 steps: sign up, choose a theme, add pages, set up products, configure navigation, set up payments, connect a domain, and launch. You can have a basic store running in a single afternoon without any coding knowledge.
Creating a Shopify website in 2025 isn’t actually about fancy designs or complex technology.
Despite what most guides tell you, the stores that succeed focus on just 8 core elements and nail them perfectly. After building Shopify sites for clients that generate millions in revenue, we have identified exactly what those elements are.
This is your shopify store setup guide to build a Shopify website that doesn’t just exist online but actively works to convert browsers into buyers from day one.
What is a Shopify Website?
Before diving into the how-to steps, let’s clarify what exactly a Shopify website is and what it can do for your business.
A Shopify website is more than just a digital storefront, it’s a complete eCommerce ecosystem that handles everything from displaying your products to processing payments and managing shipping.
The Difference Between a “Website” and a “Store”
While traditional websites simply present information, a Shopify website combines:
- A customer-facing storefront (what visitors see)
- A powerful backend dashboard (what you use to manage everything)
- Built-in shopping cart and checkout functionality
- Marketing tools and analytics
- Blog capabilities
- Customer account management
Who Can Benefit from a Shopify Website?
Shopify works beautifully for various business models:
- Direct-to-consumer (D2C) brands selling physical products
- Digital product sellers (ebooks, courses, software)
- Dropshippers who don’t handle inventory
- Service providers who want to sell packages
- Creators monetizing their audience
Pro Tip: Even if you’re not quite ready to sell products, you can use Shopify to build your brand presence and collect email subscribers while you prepare your offerings.
Before You Build: Essential Business Foundation
1. Define Your Target Customer
Create a buyer persona by answering:
- Age range, income level, location
- Where they currently shop for similar products
- What problem your product solves for them
- Their biggest objection to purchasing online
Quick validation test:
- Search your main product keyword in Google Trends
- Check if search volume is growing or stable (avoid declining)
- Verify 1,000+ monthly searches using Google Keyword Planner
2. Choose Your Business Model
| Model | Profit Margin | Startup Cost | Best For |
|---|---|---|---|
| Dropshipping | 10-30% | $500-$2,000 | Testing products, minimal investment |
| Print-on-Demand | 20-40% | $200-$1,000 | Creative designs, custom products |
| Direct-to-Consumer | 40-60% | $2,000-$10,000 | Unique products, brand building |
| Wholesale/Retail | 30-50% | $5,000-$25,000 | Established products, inventory control |
3. Set Up Business Structure
For most online stores: Choose LLC
- Personal asset protection
- Business credibility with suppliers/customers
- Tax flexibility
- Cost: $50-$500 depending on state
Essential registrations:
- Business name registration
- EIN number (free from IRS)
- Sales tax permit (if required in your state)
4. Legal Compliance Checklist
Required for all stores:
- Privacy Policy (use Shopify’s free generator)
- Terms of Service
- Refund/Return Policy
If selling to EU customers:
- GDPR compliance (cookie consent, data handling)
Product-specific requirements:
- Food: FDA labeling, nutritional info
- Children’s products: CPSIA safety testing
- Electronics: FCC certification
- Cosmetics: Ingredient labeling
5. Financial Planning
Startup budget breakdown:
- Shopify plan: $39/month minimum
- Domain: $15/year
- Theme (optional): $150-$350
- Initial marketing: $1,000 minimum
- Total: $1,500-$3,000 for the first 3 months
Revenue targets:
- Month 1-3: Break even on expenses
- Month 4-6: $2,000-$5,000/month
- Month 7-12: $5,000-$15,000/month
Key metrics to track:
- Customer acquisition cost (should be less than 30% of average order value)
- Conversion rate (aim for 2-3% minimum)
- Average order value
Pre-Setup Decision Checkpoint
Answer these before creating your Shopify account:
- Who is your specific target customer?
- What’s your profit margin per product?
- Do you have $1,500-$3,000 for initial setup and marketing?
- Have you registered your business structure?
- Do you understand legal requirements for your products?
If you answered “no” to any question, complete that step before proceeding to Shopify setup.
Step-by-Step: How to Create a Website on Shopify
Let’s break down the process to build shopify website step by step.
1. Sign Up for Shopify
Getting started with Shopify is straightforward:
- Visit Shopify and click “Start free trial.”
- Enter your email address
- Create a password and store a name
Your store name doesn’t need to be perfect right away, you can change it later. Shopify gives you a 14-day free trial to explore the platform before committing.
Warning: Your free subdomain (yourstore.myshopify.com) will be visible to customers unless you connect a custom domain, so plan to purchase one before launching.
2. Choose a Theme
Your theme determines how your store looks and feels to visitors.
Free vs. Paid Themes:
Shopify offers several free themes that are mobile-responsive and professionally designed. Paid themes (typically $150-$350) offer more specialized features and unique designs.
For 2025, standout free themes include:
- Dawn (minimalist and fast)
- Sense (great for larger catalogs)
- Craft (perfect for artisanal brands)
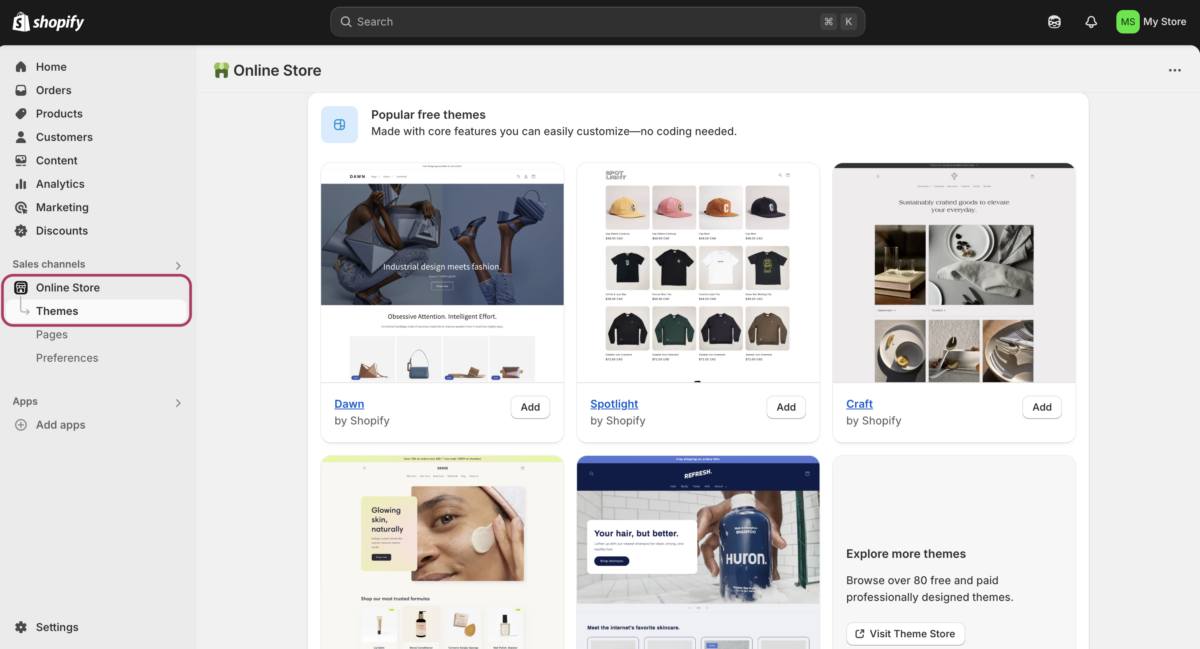
To install a theme:
- From your Shopify admin, go to “Online Store” → “Themes”
- Click “Explore free themes” or “Visit Theme Store.”
- Browse themes and install the one you like
Customizing Your Theme: After installing, click “Customize” to enter the visual editor where you can:
- Change colors and fonts
- Adjust layout settings
- Add your logo
- Configure homepage sections
- Create collection pages
No coding required, everything is drag-and-drop or controlled through simple settings.
3. Add Pages to Your Website
Every professional Shopify website needs standard pages that visitors expect to find:
Essential Pages:
- Home – Your storefront’s main landing page
- About – Share your brand story and mission
- Contact – How customers can reach you
- FAQ – Answer common questions
- Policy pages – Privacy policy, terms of service, shipping policy
To create a page:
- In your Shopify admin, go to “Online Store” → “Pages”
- Click “Add page.”
- Enter a title and content
- Set SEO details (title tag and description)
- Click “Save.”
Setting Up Your Blog: If content marketing is part of your strategy:
- Go to “Online Store” → “Blog posts”
- Click “Create blog post.”
- Add your content, featured image, and SEO details
4. Add Products
Products are the heart of your Shopify store. Here’s how to add them effectively:
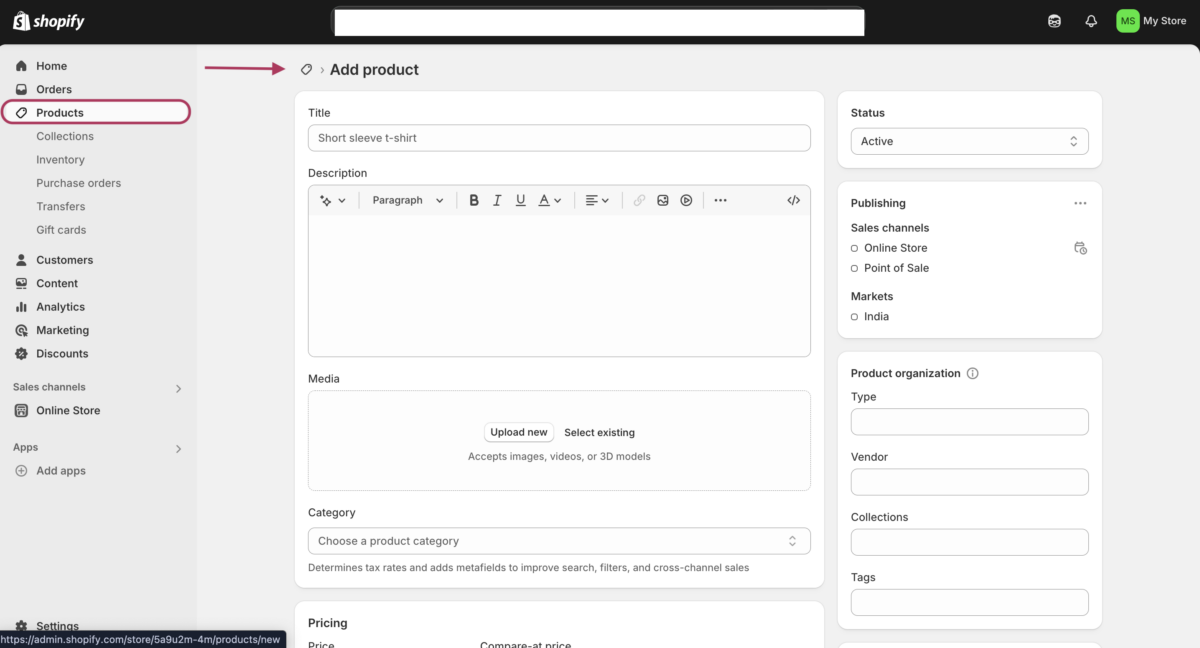
- From your dashboard, go to “Products” → “Add product”
- Add a clear title (include keywords naturally)
- Write a compelling description (focus on benefits, not just features)
- Upload high-quality images (at least 4-6 per product)
- Set pricing information
- Configure inventory tracking if needed
- Add shipping details (weight, dimensions)
- Save your product
Organizing with Collections: Collections help group similar products together, making it easier for customers to shop
- Go to “Products” → “Collections” → “Create collection”
- Choose between manual collections (you add products individually) or automatic collections (products are added based on conditions you set)
- Add collection image and description
- Set conditions if automatic
- Save your collection
Pro Tip: Create collections based on how customers shop, not just product categories. Think “Gifts under $50” or “Summer Essentials” rather than just “Shirts” or “Accessories.”
Why This Step Matters
Your products are added, but visitors won’t buy without trust signals. Studies show that 61% of customers read reviews before purchasing, and sites with trust badges see 42% higher conversion rates. This step transforms browsers into buyers.
Essential Trust Elements
Customer Reviews & Social Proof
Set up before launch:
- Install Shopify’s free Product Reviews app
- For new stores: Use reviews from suppliers/manufacturers (with permission)
- Add customer count badges: “Join 1,247+ happy customers”
- Include “As seen in” logos if you have any media coverage
Security & Trust Badges
Add these immediately:
- SSL certificate badge (free with Shopify)
- Payment security badges (Visa, Mastercard, PayPal logos)
- Money-back guarantee badge
- Secure checkout badge
Where to place them:
- Footer of every page
- Near “Add to Cart” buttons
- On checkout page
Professional Business Information
Must-have elements:
- Physical business address (even if home-based, use a PO Box)
- Business phone number (Google Voice is fine)
- Professional email address (@yourdomain.com, not Gmail)
- Clear return/refund policy (maximum 30 words)
Conversion Rate Optimization
Product Page Optimization
High-impact changes:
- Add urgency: “Only 3 left in stock”
- Include shipping info: “Free shipping over $50”
- Show multiple payment options: “Buy now, pay later available”
- Add size guides for apparel
- Use benefit-focused product descriptions, not just features
Cart Abandonment Prevention
Shopify settings to adjust:
- Enable exit-intent pop-ups (use free apps like Privy)
- Set up abandoned cart email recovery (24 hours, 3 days, 1 week)
- Offer guest checkout (don’t force account creation)
- Display total cost including shipping early in checkout
Mobile Conversion Optimization
Essential for 70%+ of traffic:
- Test entire checkout process on mobile
- Ensure buttons are thumb-friendly (minimum 44px)
- Reduce form fields to essential only
- Enable Apple Pay and Google Pay
Conversion Rate Benchmarks
Industry standards to measure against:
- Overall conversion rate: 2-3%
- Mobile conversion rate: 1.5-2.5%
- Cart abandonment rate: 60-70% (lower is better)
- Email recovery rate: 15-25%
If your rates are below these benchmarks, focus on:
- Page loading speed (under 3 seconds)
- Clear value proposition on homepage
- Simplified checkout process
- More trust signals
This step often doubles conversion rates for new stores. Don’t skip it.
5. Set Up Navigation
Clear navigation is crucial for helping customers find what they’re looking for:
Main Menu Setup:
- Go to “Online Store” → “Navigation”
- Edit the “Main menu”
- Add menu items linking to your key pages and collections
- Arrange them in logical order (most important first)
- Create dropdown menus if needed by dragging items under parent items
Footer Menu:
- Edit the “Footer menu”
- Add links to policy pages, the about page, and the contact page
- Consider adding collection links here as well
Keep your main navigation simple, aim for 5-7 main categories maximum to avoid overwhelming visitors.
6. Configure Payments and Shipping
To turn browsers into buyers, you need seamless payment and shipping options:

Payment Gateways:
- Go to “Settings” → “Payments”
- Activate Shopify Payments if available in your country (lowest fees)
- Add additional payment methods like PayPal, Apple Pay, or country-specific options
- Complete the verification process if required
Shipping Settings:
- Go to “Settings” → “Shipping and delivery”
- Create shipping zones based on where you’ll ship to
- Set rates for each zone (free shipping, flat rate, or calculated)
- Configure local delivery or pickup options if offered
Warning: Unexpected shipping costs are the #1 cause of cart abandonment. Be transparent about shipping fees or include them in your product pricing.
7. Connect a Domain
A professional domain name builds trust with customers:
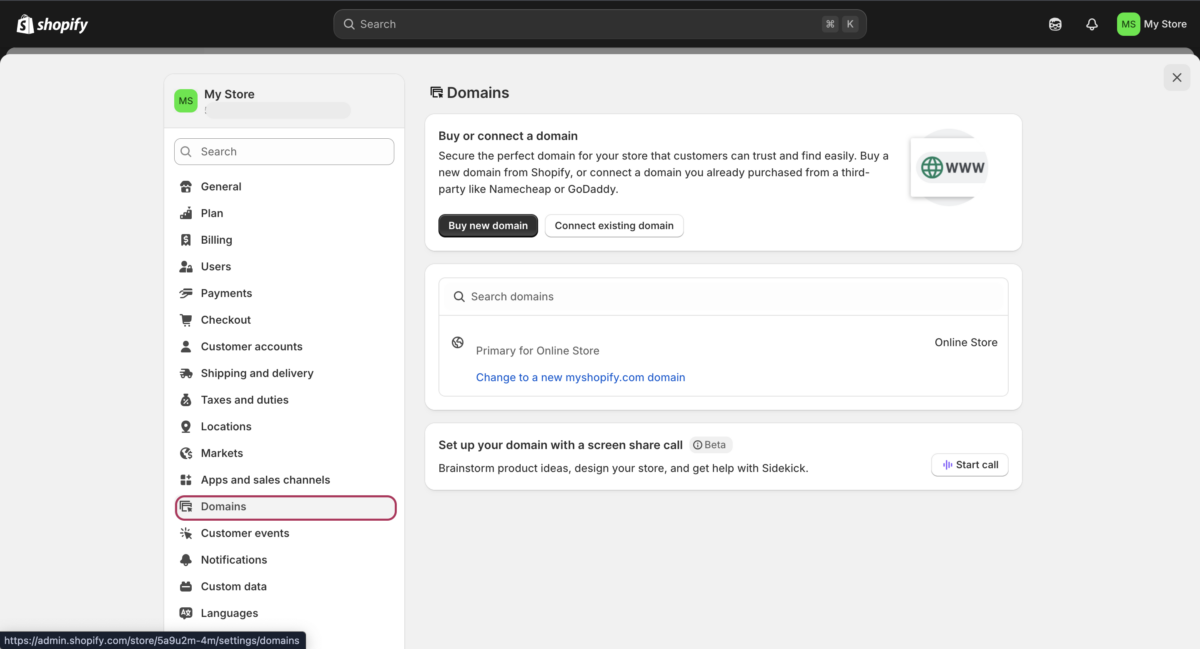
Option 1: Buy Through Shopify
- Go to “Online Store” → “Domains”
- Click “Buy new domain.”
- Search for available domains
- Complete purchase (typically $14-20/year)
Option 2: Connect Existing Domain
- Go to “Online Store” → “Domains”
- Click “Connect existing domain.”
- Enter your domain name
- Follow instructions to update DNS settings at your domain provider
After connecting, set it as your primary domain so customers see your branded URL instead of the myshopify.com address.
8. Preview and Launch
Before going live, thoroughly review your store:
Pre-Launch Checklist:
- Test the checkout process with a real order
- Verify all links work correctly
- Check your store on mobile devices
- Confirm email notifications are working
- Install Google Analytics for tracking
- Set up Facebook pixel if using Facebook ads
To Launch:
- Go to “Online Store” → “Preferences”
- Scroll to “Password protection.”
- Disable password protection
- Save changes
Congratulations! Your Shopify website is now live and ready for customers.
Ready to skip the DIY approach?
Example Shopify Website Structures
Different businesses require different website structures. Here are some proven layouts:
Basic Online Store Structure
- Home – Featured products, collections, and brand story
- Shop – All products with filtering options
- Collections – Grouped product categories
- About – Brand story and mission
- Contact – Form and business information
Fashion Brand Structure
- Home – Seasonal collection highlights
- Shop – Categorized by Women’s, Men’s, Accessories
- New Arrivals – Latest products
- Lookbook – Styled outfits and inspiration
- Sustainability – Ethical practices information
- About/Contact – Brand story and support
Digital Products Structure
- Home – Featured courses/downloads
- Products – All digital offerings
- Blog – Content marketing hub
- Resources – Free tools or guides (lead magnets)
- About – Creator story and credentials
- Support – FAQs and contact information
This two-column table compares different business models on Shopify:
| Business Type | Recommended Features | Typical Conversion Rate |
| Physical Products | High-quality product images, customer reviews, and size guides | 1.5-3% |
| Digital Products | Booking tools, testimonials, and detailed service descriptions | 2-5% |
| Service Business | Booking tools, testimonials, detailed service descriptions | 1-3% |
Shopify vs. Other Website Builders
Before committing to Shopify, it’s smart to understand how it compares to other popular website building platforms.
Each platform has strengths and weaknesses, and the “best” choice depends on your specific business needs, technical skills, and growth plans.
| Platform | Best For | Ease of Use | eCommerce Focus | Monthly Cost | Learning Curve |
|---|---|---|---|---|---|
| Shopify | Online stores | Very Easy | Excellent | $39-$399 | Low |
| WordPress + WooCommerce | Customization lovers | Moderate | Good | $15-$100+ | High |
| Wix | Beginners | Very Easy | Fair | $14-$39 | Very Low |
| Squarespace | Creative businesses | Easy | Good | $12-$40 | Low |
| BigCommerce | Large inventories | Moderate | Excellent | $39-$400 | Moderate |
Shopify: The eCommerce Specialist
What Shopify Does Best
- Built for selling: Every feature designed specifically for eCommerce
- All-in-one solution: Hosting, payments, inventory, marketing tools included
- Scalability: Handles everything from 1 product to 100,000+ products
- Mobile commerce: Industry-leading mobile checkout and admin app
- App ecosystem: 8,000+ apps for any functionality you need
- Global reach: Multi-currency, international shipping, tax calculations
Shopify’s Limitations
- Monthly fees: Ongoing subscription costs even with low sales
- Transaction fees: 2.4%-2.9% on top of payment processing
- Limited blogging: Basic blog functionality compared to WordPress
- Theme constraints: Less design flexibility than custom-coded sites
- Shopify dependency: Difficult to migrate away if you want to leave
Choose Shopify If:
- Your primary goal is selling products online
- You want to launch quickly without technical hassles
- You plan to scale and need professional eCommerce features
- You prefer ongoing support over DIY troubleshooting
- Mobile commerce is important to your business
Advanced Shopify Features to Boost Your Store
Once your basic store is running, these advanced features can significantly improve performance and sales.
Shopify AI Tools
Shopify Magic helps you create content faster:
- Product descriptions: Auto-generate compelling copy from basic details
- Blog posts: Create SEO-friendly articles quickly
- Email campaigns: Write marketing emails with proper tone
- Image editing: Remove backgrounds and enhance photos automatically
How to use: Look for “Generate with AI” buttons in product editor and blog sections.
Result: Save 2-3 hours per week on content creation while improving quality.
Theme Customization Beyond Basics
Custom Code Additions:
- Add custom CSS for unique styling
- Insert tracking codes (Google Analytics, Facebook Pixel)
- Modify theme templates for special layouts
- Add custom product fields and filters
Safe Customization Process:
- Always duplicate your theme before changes
- Use the code editor in Online Store > Themes
- Test changes on duplicated theme first
- Backup original code before modifications
When to Hire Help: If you need complex functionality, custom apps, or major design changes.
Essential Analytics Setup
Google Analytics 4 Integration:
- Install “Google & YouTube” app from Shopify App Store
- Connect your Google Analytics account
- Enable enhanced ecommerce tracking
- Set up conversion goals for purchases
Key Metrics to Monitor:
- Conversion rate by traffic source
- Average order value
- Cart abandonment rate
- Top-performing products
- Customer lifetime value
Monthly Review: Check these metrics monthly to identify improvement opportunities.
Performance Optimization
Speed Improvements:
- Compress product images (under 100KB each)
- Remove unused apps regularly
- Use Shopify’s built-in lazy loading
- Minimize custom code additions
Mobile Optimization:
- Test checkout process on mobile devices
- Ensure all buttons are easily tappable
- Optimize images for mobile viewing
- Keep navigation simple on small screens
Speed Test Tools: Use Google PageSpeed Insights monthly to monitor performance.
Security and SEO Essentials
Security Setup:
- Enable two-factor authentication for admin access
- Set proper staff permissions
- Regular password updates
- Monitor for suspicious activity
- Add alt text to all product images
- Write unique meta descriptions for key pages
- Use proper heading structure (H1, H2, H3)
- Create SEO-friendly URLs
- Submit sitemap to Google Search Console
Tips to Make Your Shopify Website Look Professional
Having built dozens of successful Shopify stores, here are my top tips for creating a site that looks professionally designed:
1. Invest in Visual Branding
- Use a consistent color palette (2-3 main colors)
- Choose complementary fonts (one for headings, one for body text)
- Create a recognizable logo and favicon
- Maintain visual consistency across all pages
2. Optimize Your Product Photography
- Use consistent backgrounds and lighting
- Show products from multiple angles
- Include lifestyle images showing products in use
- Maintain consistent image dimensions
3. Write Customer-Focused Copy
- Focus on benefits rather than features
- Keep paragraphs short (2-3 sentences max)
- Use bullet points for key information
- Address customer pain points directly
4. Add Social Proof Elements
- Customer reviews and testimonials
- Trust badges and security icons
- “As featured in” media mentions
- Social media follow/share buttons
5. Optimize for Mobile Users
- Test all pages on multiple devices
- Ensure tap targets are large enough
- Simplify navigation for small screens
- Compress images for faster loading
Pro Tip: The difference between a good Shopify store and a great one often comes down to attention to detail, consistent spacing, proper image sizing, and thoughtful color application.
Common Mistakes to Avoid When Setting up Shopify Store
After helping dozens of clients launch successful Shopify sites, we have seen these mistakes repeatedly hamper growth:
1. Overly Complicated Navigation
Visitors get overwhelmed by too many menu options. Keep your main navigation simple with 5-7 items maximum.
2. Missing or Vague Product Information
Customers need complete details to make purchase decisions. Include dimensions, materials, care instructions, and sizing details.
3. Slow Loading Speed
Each second of load time dramatically reduces conversions. Compress images, minimize apps, and choose a fast theme.
4. Poor Mobile Experience
Over 70% of Shopify traffic is mobile. Test your entire buying process on smartphones to ensure smooth navigation.
5. Hidden Shipping Costs
Surprise fees at checkout cause abandonment. Be transparent about shipping costs or include them in your product pricing.
6. No Clear Return Policy
Customers want reassurance before buying. Create and prominently display a fair, clear return policy.
7. Neglecting SEO Basics
Take time to complete title tags, meta descriptions, and alt text for images to improve organic discovery.
Warning: Installing too many apps can significantly slow down your store and create conflicts. Only install what you truly need, and regularly audit your apps to remove unused ones.
Worried about making these common mistakes?
Ready to Launch Your Shopify Site?
Creating a Shopify website has never been more accessible than in 2025. With its intuitive interface, responsive themes, and robust app ecosystem, you can build a professional online store without technical expertise.
The most successful Shopify stores aren’t necessarily the most complex. This Shopify website creation tutorial helps you learn how to clearly communicate value, make shopping easy, and deliver excellent customer experiences.
Need help building a Shopify website that truly stands out and converts visitors? At 2HatsLogic, we specialize in creating high-performance Shopify stores for businesses of all sizes. Whether you need a complete store setup or want to optimize your existing site, our team of Shopify experts can help you achieve your eCommerce goals.
Contact us today to discuss how we can help bring your Shopify vision to life!
FAQ
Can I create a non-eCommerce website on Shopify?
Yes! While Shopify is optimized for selling, you can use it for content-focused sites by emphasizing pages and blog posts instead of products. However, you'll still pay the monthly fee, so for purely informational sites, platforms like WordPress might be more cost-effective.
Is Shopify good for service-based businesses?
Absolutely. Service businesses can create packages as products, use booking apps for scheduling, and leverage the secure payment system. Many coaches, consultants, and local service businesses thrive on Shopify.
How much does it cost to run a Shopify website?
Shopify plans range from $29/month (Basic) to $299/month (Advanced), plus potential costs for premium themes ($150-350 one-time), apps ($0-50/month per app), and domain name ($14-20/year). Most beginners can launch with $50-100/month total investment.
How long does it take to build a Shopify website?
A basic store can be set up in 1-2 days. A more comprehensive store with custom design elements and a larger product catalog typically takes 1-2 weeks. With focused effort, you could launch a minimal viable store in a single afternoon.
Is coding required to build a Shopify site?
No coding is required to create a fully functional, professional-looking Shopify store. The visual editor and settings provide all the customization most businesses need. For highly custom features, you can hire a developer or use one of the many apps in the Shopify App Store.
What's the difference between Shopify and WordPress for ecommerce?
Shopify is specifically built for ecommerce with built-in payments, inventory management, and hosting. WordPress requires additional plugins and technical setup but offers more customization flexibility.


Related Articles