
Greetings! I'm Aneesh Sreedharan, CEO of 2Hats Logic Solutions. At 2Hats Logic Solutions, we are dedicated to providing technical expertise and resolving your concerns in the world of technology. Our blog page serves as a resource where we share insights and experiences, offering valuable perspectives on your queries.
React native is a great tool to develop your mobile app in android and at the same time in iOS too. In my last project, the biggest issue that I faced with it is the complexity of the state management between react native components. If you can anticipate your project is going to bigger in size this would be a great choice to use Redux for state management.
This blog is mainly intended to configure the Redux and connect with your existing app with it. Redux is a javascript library you can manage your application states. The main idea behind using redux is that if you have a central store the components will become more flexible to access and update the state from the same place.
You can manage the data flow of an application using redux and use like an advanced tool that accomplish the updating of data in UI part. It’s not mandatory to use redux in all react native project. You can create an entire application without redux. But the application gets bigger in size and complexity a plain react may cause a headache on its state managing level.
Data Flow
React itself is hard to data transfer between components. For a large project, this is going to be really messy. At the same time, we may need to unnecessarily transfer data between components. Check out the following image that shows a data flow in react alone.
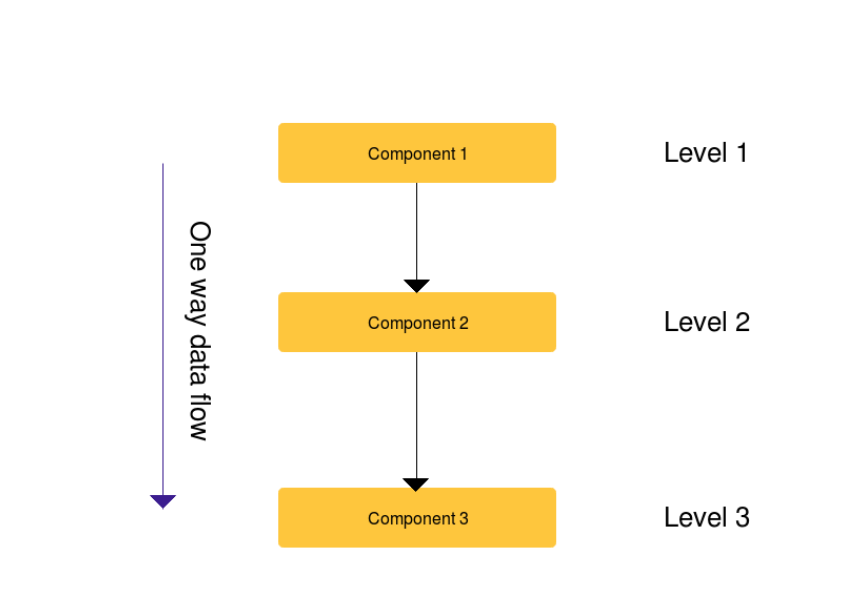
This is a representation of data transfer between three level components. If you want to transfer the data from the first level to third, you are actually unnecessary sharing the data with a second level component. This is because in react it is only possible to do a one-way data transfer. In the applicated level we get more confused about why we use this props since the component is not using it.
Take a look at the following image that shows how redux comes to help here.
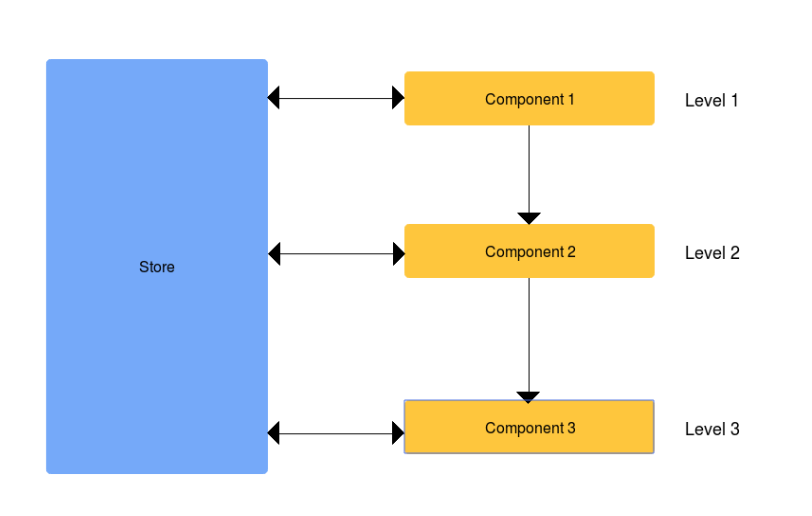
When comes to Redux all the state are stored in a single place called a store. So in the above case – level one component update the state in store and level three component fetch the updated state from the store. A store is nothing just a javascript object that holds the states for the entire application. The idea behind using a central store is you do not need to split up the state over multiple components.
Actions
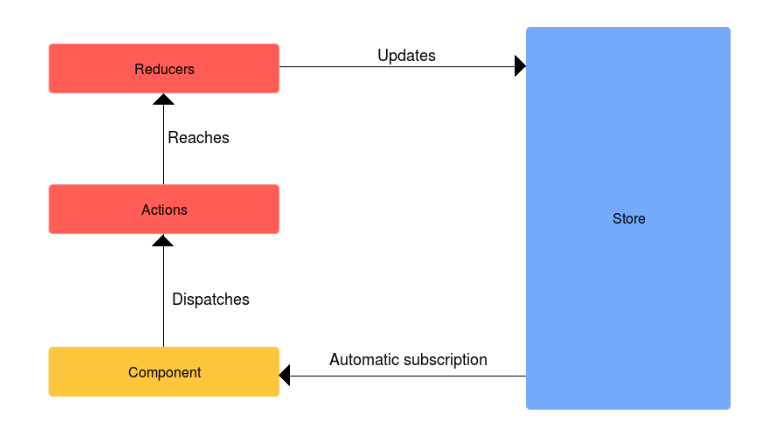
A user is interacting with components or in short, those components manipulate the states of the application. The way to manipulate the state is dispatching an action. The action is the messages we send to store or it can be considered pre-defined information packages.
| 1 2 3 4 5 6 | export const addPost = post => { return { type: ADD_POST, payload: post }; }; |
Take a look into return object, it doesn’t contain much code simply a message. In this case, the message adds a new post or user is wants to create a new post or something. And also there will be some data called payload with the message that going to manipulate the state. So we say addPost is a message to do something with data provided in the payload.
Reducers
The actions never update the state directly here the reducers come into the scene. The idea of reducers is to receive the action and update the states. This is an important term where the actual scripts take place or manipulate the state and return the brand new updated state of the application. In technically there may be only one root reducer for the application or we can combine multiple reducers into a root reducer.
Whenever the central store gets to update it trigger some automatic subscription for the component. I.e when the component subscribes the updated state from the store the UI of the app get updated with new information. The whole process closing a circle called life cycle of a redux application.
For adding redux to our application we need to install some third party library. These are the library containing normal JavaScript and going to run on the native device. You can use the npm for installing those packages
npm install redux
npm install react-redux
Folder Structure and Files
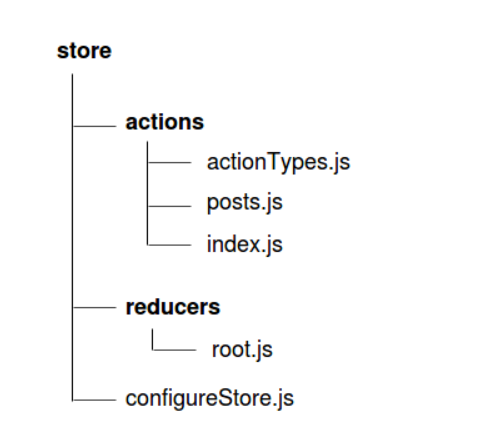
ActionType contains a set of constants that export from the file as below
| 1 | export const ADD_POST = 'ADD_POST; |
By doing this we can use the constants in a different place and avoid error due to miss type, this is because such errors are not much easy to find out. Posts.js is the action creator file which contains all the actions. In a large project, there may be multiple action creator in the app for the convenience we may export all the actions from the same file called index.js – but this not mandatory and is up to you. The file root.js is the reducer that will distinguish the state manipulation to be executed according to the action type.
| 1 2 3 4 5 6 7 8 9 10 | import { Provider } from ‘react-redux’; Import configureStore from ‘./store/configureStore’; const store = configureStore(); <Provider store={store}> <App /> </Provider> AppRegistry.registerComponent("MyAPP", () => RNRedux); |
We are importing a provider component into the index.js file and will connect to the store. The application root component (<App />) is basically wrap up with the provider so that it will be available with the central store of the application.
We have to define the function configureStore in configureStore.js. The purpose of this file is to create the store and combine the reducers. You will import all the reducer to the file and combine into the rootReducer.
| 1 2 3 4 5 6 7 8 9 10 11 12 | import { createStore, combineReducers } from "redux"; import postReducer from "./reducers/posts"; const rootReducer = combineReducers({ posts: postReducer }); const configureStore = () = { return createStore(rootReducer); } export default configureStore; |
When executing the ConfigureStore it will return a store and we pass that store to the provider. This is important to note that only the component within the provider can be connected to the store.
Connect
So we have a central redux store now. Next step is to connect App component to this store. In this point, we can either retrieve data by obtaining its current state or change its state by dispatching an action. To make this possible needs to import a higher order component called connect.
| 1 | import { connect } from "react-redux"; |
Connect is a function which returns a function and we pass App as the arguments to it. The function connects expect two arguments called mapStateToProps and mapDispatchToProps. Using connect this going to be a new method to exporting your App component.
| 1 | export default connect(mapStateToProps, mapDispatchToProps)(App);<span id="mce_marker" data-mce-type="bookmark" data-mce-fragment="1"></span> |
| 1 2 3 4 5 | const mapStateToProps = state => { return { posts: state.posts.posts }; };<span id="mce_marker" data-mce-type="bookmark" data-mce-fragment="1"></span><span id="mce_marker" data-mce-type="bookmark" data-mce-fragment="1"></span> |
mapDispatchToProps is also a function that receives dispatch function as an argument. Here we return a javascript object which maps some properties of our choice to props used in the component. So a local component can access the function onAddPost from its props which dispatch an action called addPost.
mapStateToProps is a function that receives a state from combine reducer. In this case, the state will have reducer posts and props posts.
| 1 2 3 4 5 | const mapDispatchToProps = dispatch => { return { onAddPost: (post) => dispatch(addPost(post)), }; }; |
So here you installed and configure the Redux with your application. Your component gets more simplified and not need to worry about state management. In the component level, you just need to connect the component with a store and dispatch the actions.
We have foreseen the evolution and the drastic change in the tech world and switched to the technology at the earliest. Now we are stepping as a React Native Development Company and giving the perfect solution for every scenario we came across.


Related Articles