Greetings! I'm Aneesh Sreedharan, CEO of 2Hats Logic Solutions. At 2Hats Logic Solutions, we are dedicated to providing technical expertise and resolving your concerns in the world of technology. Our blog page serves as a resource where we share insights and experiences, offering valuable perspectives on your queries.

So, you’re staring at your outdated CMS and thinking about migrating to TYPO3.
But here’s what’s keeping you up at night: What happens to all those hard-earned rankings? What about the traffic you’ve spent years building? What about those backlinks pointing to your old URLs?
Every web manager, developer, and marketing team faces the same fear when planning a CMS migration. One wrong move, and you could watch your organic traffic tank overnight.
The good news? With the right strategy, you can migrate your legacy CMS to TYPO3 without losing a single ranking point. We’ve helped dozens of enterprises and agencies make this exact move, and we’re going to show you exactly how to do it.
Let’s dive in.
Why SEO Should Be Your Top Priority During CMS Migration
Here’s the brutal truth: Most CMS migrations hurt SEO.
According to industry studies, up to 30% of sites experience traffic drops after migration. Why? Teams focus on the technical move and forget about the SEO foundations that took years to build.
When you migrate to TYPO3, you’re not just moving content. You’re moving:
- Years of link equity
- Carefully optimized metadata
- URL structures that Google trusts
- Internal linking architecture
- Structured data and rich snippets
Miss any of these, and Google treats your new TYPO3 site like a brand new website. You’ll start from zero.
That’s why TYPO3 is actually a smart choice for SEO-heavy migrations. Unlike some CMSs, TYPO3 gives you granular control over URLs, redirects, meta tags, and site structure, exactly what you need to preserve your SEO equity.
How to Execute a Risk-Free CMS to TYPO3 Migration (Step-by-Step)
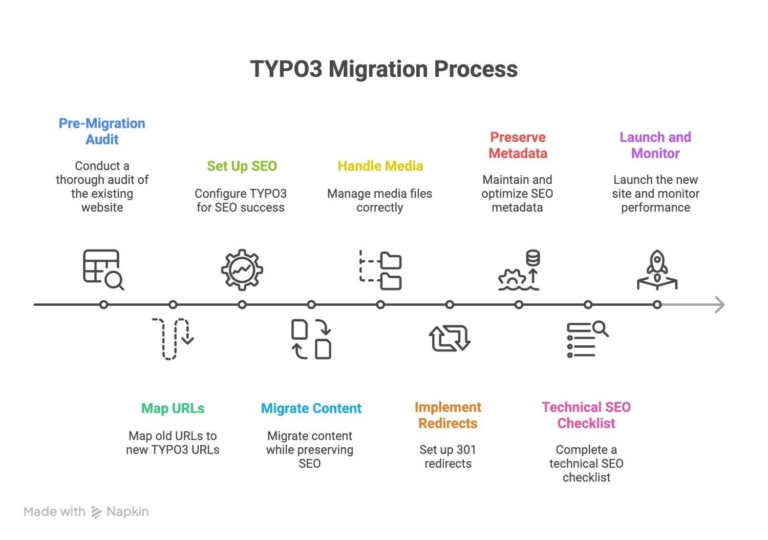
Step 1: Pre-Migration Audit
Before you touch a single line of code, you need to know exactly what you’re moving.
Start by creating a complete inventory:
What to Document:
- Every page, blog post, and landing page on your current site
- Current URL structure and patterns
- Top 50 traffic-driving pages (Google Analytics)
- All external backlinks (use Ahrefs or SEMrush)
- Current keyword rankings for priority pages
- All redirects are already in place
- Media files (images, PDFs, videos) and their alt text
Use Screaming Frog or Sitebulb to crawl your entire site. Export everything into a spreadsheet. This becomes your migration blueprint.
Pro tip: Pay special attention to your top 20% of pages; they likely drive 80% of your traffic. These pages get VIP treatment during migration.
Content Pruning Opportunity
Here’s a bonus: Migration is the perfect time to retire dead weight.
Got pages with zero traffic and zero backlinks? Pages that haven’t been updated since 2015? This is your chance to consolidate, merge, or retire content that’s dragging down your site quality.
Just make sure you redirect pruned URLs to relevant alternatives; never let them 404.
Step 2: Map Your Old URLs to New TYPO3 URLs
This is where most migrations fail.
You have two choices:
Option A: Keep your existing URL structure
If your current URLs are clean and SEO-friendly (like /services/web-development/), keep them in TYPO3. This is the safest route, no redirects needed, zero risk.
Option B: Change your URL structure
Sometimes you need to change URLs (rebranding, better structure, etc.). That’s fine, but you’ll need a bulletproof redirect strategy.
Create a URL mapping spreadsheet with three columns:
| Old URL | New TYPO3 URL | Redirect Type |
| /old-blog-post.html | /blog/old-blog-post/ | 301 |
| /products/item-123 | /services/item-123/ | 301 |
Every. Single. URL. No exceptions.
Tip: Use a tool like Screaming Frog to export your old URL list, then map them in bulk. Don’t try to do this manually; you’ll miss URLs and create 404 nightmares.
Step 3: Set Up TYPO3 for SEO Success
Before you import a single piece of content, configure TYPO3 properly.
Essential TYPO3 SEO Setup:
Install SEO Extensions:
- yoast_seo or cs_seo for meta tag management
- seo (TYPO3’s core SEO extension)
- Redirects module for 301 management
Configure Site Settings:
- Set your base URL correctly (https://yourdomain.com)
- Enable URL rewriting for clean URLs
- Set up multi-language if needed
- Configure XML sitemap generation
Set Up Technical SEO:
- Create robots.txt (allow Google to crawl your site)
- Enable automatic XML sitemap (update after content import)
- Configure canonical URLs to prevent duplicate content
- Set up Schema.org structured data templates
TYPO3 makes this easier than most CMSs. The site configuration YAML file lets you control everything from one place.
Step 4: Migrate Content While Preserving SEO
Now comes the actual move.
Content Export from Legacy CMS:
Most CMSs let you export content as XML, JSON, or CSV. If your old CMS doesn’t have export tools, you might need custom scripts or database queries.
What to preserve during export:
- Page titles and meta descriptions
- Body content (with HTML formatting)
- Author and publication dates
- Categories and tags
- Image alt text and titles
- Custom fields and metadata
Importing into TYPO3:
TYPO3 doesn’t have a one-click WordPress importer (unlike some platforms). You’ll likely use:
- Custom import scripts (PHP)
- TYPO3 DataHandler API
- Third-party import extensions
- Or manual content recreation (only for small sites)
The key is don’t just copy-paste content. Make sure:
- H1 tags remain H1 tags
- Internal links update to new TYPO3 URLs
- Image paths update to TYPO3’s file structure
- Author attribution carries over
Test your import on a staging environment first. Always.
Step 5: Handle Media Files Correctly
Media migration is where broken links hide.
Best Practices for Media:
- Preserve filenames: If an image was called hero-image.jpg on your old CMS, keep that filename in TYPO3. Search engines index image filenames.
- Keep alt text: Export and reimport alt text for every image. This is SEO gold and accessibility magic.
- Update internal references: Any blog post or page linking to /uploads/image.jpg needs to point to TYPO3’s new media path.
- Maintain folder structure: If possible, mirror your old media folder structure in TYPO3. This minimizes internal link breakage.
TYPO3 stores media in /fileadmin/ by default. Plan your folder structure before importing thousands of files.
Thinking about migrating your legacy CMS to TYPO3?
Step 6: Implement 301 Redirects (The Most Critical Step)
If you changed any URLs, redirects are non-negotiable.
How to Set Up Redirects in TYPO3:
Method 1: Use TYPO3’s Redirect Module
- Go to Site Management > Redirects
- Add each old URL → new URL mapping
- Select “301 Permanent” as the status code
- Save and test
Method 2: Use .htaccess (Apache)
If you have thousands of redirects, manage them via .htaccess:
Redirect 301 /old-page.html /new-page/
Redirect 301 /blog/2019/post /blog/post/
Method 3: Database Import
For large-scale migrations, import your redirect spreadsheet directly into TYPO3’s redirect database table.
Test Your Redirects:
Use tools like:
- Redirect Path (Chrome extension)
- Screaming Frog (bulk redirect testing)
- curl commands (curl -I https://yourdomain.com/old-url)
Check for:
- Redirect chains (old → temporary → final URL)
- Redirect loops (A → B → A)
- 404 errors that should be redirected
Tip: Set up monitoring in Google Search Console to catch redirect issues immediately after launch. You’ll get alerts for 404s and server errors.
Step 7: Preserve and Optimize SEO Metadata
Don’t lose your meta tags during migration—they’re ranking signals.
What to Migrate:
For Every Page:
- Title tag (keep your optimized titles)
- Meta description
- Open Graph tags (for social sharing)
- Twitter Card tags
- Canonical URL
- H1 heading structure
For Priority Pages: Take this chance to improve metadata. If your old title tag was “About Us | Company Name,” optimize it to “About Our Award-Winning Web Development Agency | Company Name.”
TYPO3’s SEO extensions make this easy. You can set:
- Default meta templates for all pages
- Override templates for specific page types
- Dynamic meta tags based on content fields
Add Structured Data:
TYPO3 supports Schema.org markup out of the box. Add structured data for:
- Articles (Blog posts)
- FAQ pages
- How-to guides
- Local business info
- Products and services
Rich snippets in search results increase CTR by up to 30%.
Step 8: Technical SEO Checklist Before Launch
Before you flip the DNS switch, validate everything.
Pre-Launch Checklist:
XML Sitemap: Generated and submitted to Google Search Console
Robots.txt: Allowing search engines (double-check!)
HTTPS: SSL certificate installed and working
Mobile-friendly: Test on Google’s Mobile-Friendly Test
Core Web Vitals: Run Lighthouse audit (target 90+ scores)
301 Redirects: All tested and working
Internal Links: No broken links (crawl with Screaming Frog)
Canonical Tags: Properly set on all pages
Meta Tags: All pages have unique titles and descriptions
Structured Data: Validated with Google’s Rich Results Test
Run a full crawl of your staging TYPO3 site. Fix every error before going live.
Step 9: Launch and Monitor
Go-live day is just the beginning.
Post-Launch Monitoring (First 30 Days):
Week 1:
- Check Google Search Console daily for indexing errors
- Monitor 404 reports and add redirects as needed
- Track ranking changes for your top 20 keywords
- Watch organic traffic in Google Analytics
Week 2-4:
- Compare traffic to the pre-migration baseline
- Fix any soft 404s (pages returning 404 content but 200 status)
- Monitor backlinks (make sure they’re resolving correctly)
- Check for duplicate content issues
Tools to use:
- Google Search Console (indexing, errors, performance)
- Google Analytics (traffic, conversions, user behavior)
- Ahrefs or SEMrush (rankings, backlinks)
- TYPO3’s redirect logs (monitor redirect usage)
If you see ranking drops on specific pages, investigate immediately:
- Are redirects working?
- Did meta tags migrate correctly?
- Is the content identical to the old version?
- Are internal links pointing to the page?
Most post-migration SEO issues are fixable within 48 hours if you catch them early.
Common TYPO3 Migration Mistakes (And How to Avoid Them)
Mistake 1: Forgetting to Test Redirects
The result: 404 errors, traffic loss, angry users.
The fix: Test every redirect before launch using automated tools.
Mistake 2: Changing URL Structure Without Planning
The result: Duplicate content, ranking drops, broken backlinks.
The fix: Map old URLs to new URLs in advance. Redirect everything.
Mistake 3: Ignoring Mobile SEO
The result: Poor mobile rankings (60% of searches are mobile).
The fix: Test the TYPO3 site on real devices and Google’s Mobile-Friendly Test.
Mistake 4: Not Monitoring Post-Launch
The result: Small issues become big problems.
The fix: Set up daily monitoring for the first two weeks after launch.
Conclusion
CMS migration doesn’t have to be scary.
With proper planning, meticulous URL mapping, and post-launch monitoring, you can move to TYPO3 while keeping every bit of SEO equity you’ve built.
The key is treating migration as an SEO project first, and a technical project second.
At 2HatsLogic, we’ve helped enterprises, universities, and agencies migrate to TYPO3 without losing a single ranking. We handle everything from content audits to redirect implementation to post-launch monitoring.


Related Articles